Daily Reports in the Web Portal
- Print
- DarkLight
- PDF
Daily Reports in the Web Portal
- Print
- DarkLight
- PDF
Article summary
Did you find this summary helpful?
Thank you for your feedback!
Key Information
The Daily Reports can be accessed in the Web Portal as well as in the STACK Field App.
It is possible to create, fill out, review, and delete a report in both interfaces.
Not only account owners and administrators have access to the Daily Reports.
Daily Reports Overview
Navigating the Daily Reports in the Web Portal
Daily Report Users and the STACK Roles
There are two different types of users of the STACK Daily Reports:
Reporter: User who creates and fills out the report.
Reviewer: User who reviews the report in order to validate that all information is accurate.
To get a detailed view of what actions each role can perform at each step of the Daily Reports, refer to the Daily Reports Permission by Role article.
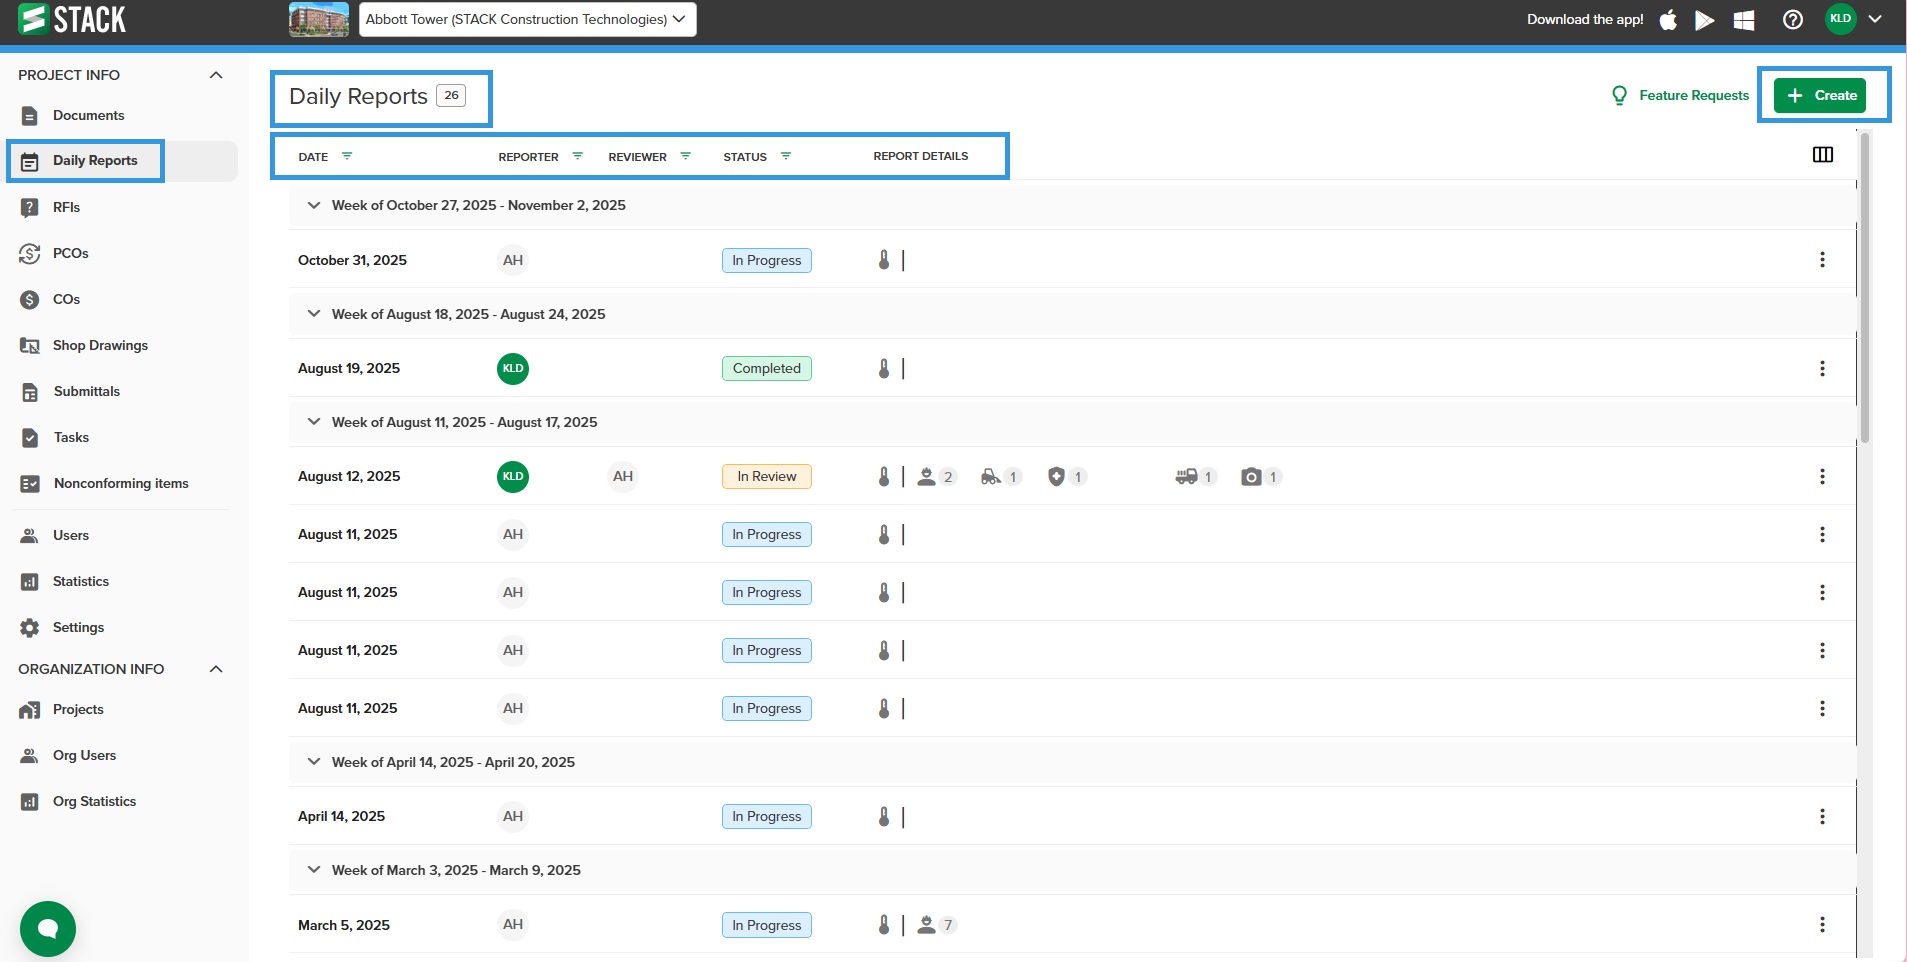
Daily Reports List Page
When you first select Daily Reports from the left navigation menu, you land on the Daily Reports List page, which gives you a quick previous of how many items have been entered per section. Only the sections that have items within them will appear in the Report Details. When clicking on an icon section, this will open the report directly on that section.
Clicking the three dots or right clicking on one of the Daily Reports allows:
Opening the Report
Copying the link to share it with others
Generating a PDF of the report
Generating a XLS of the report
Deleting the report
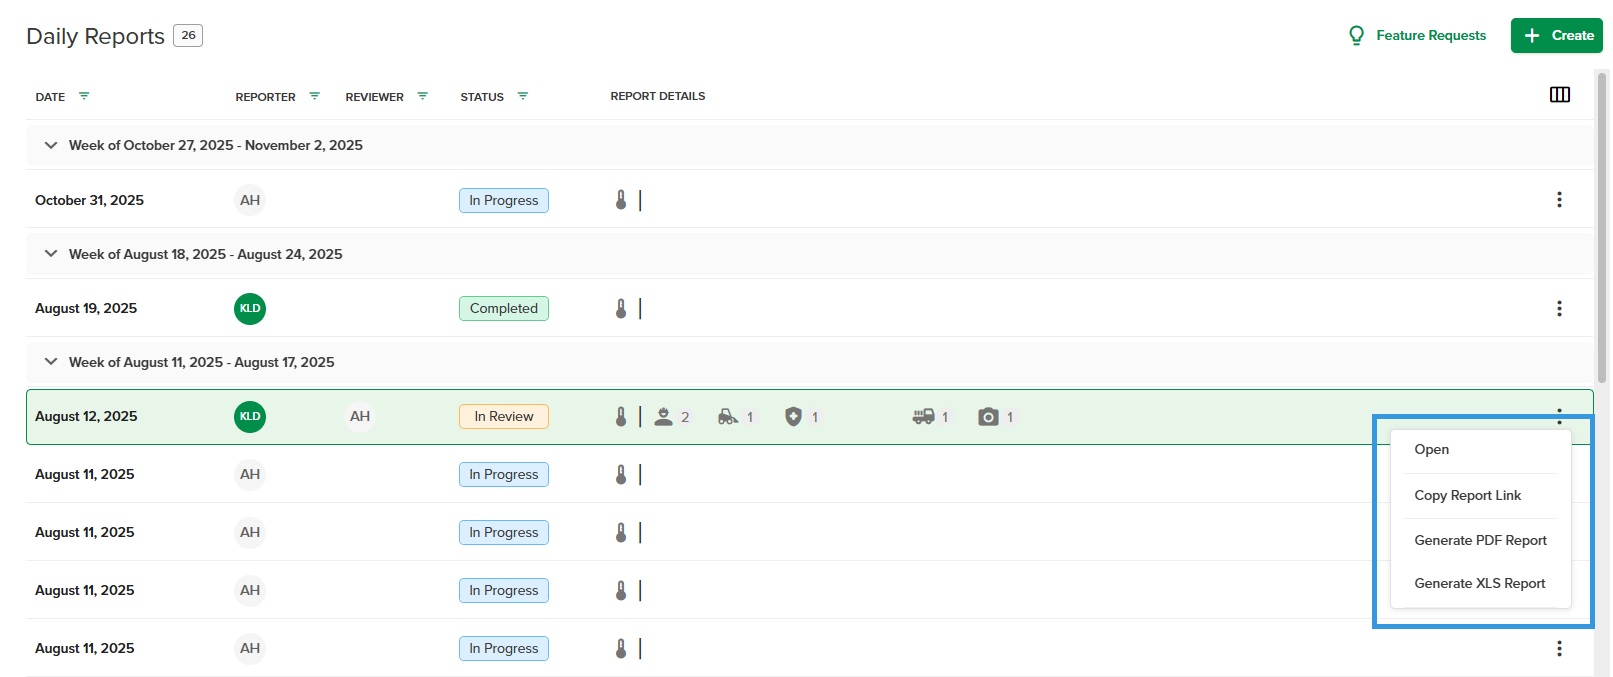
Double clicking on a report allows opening it.
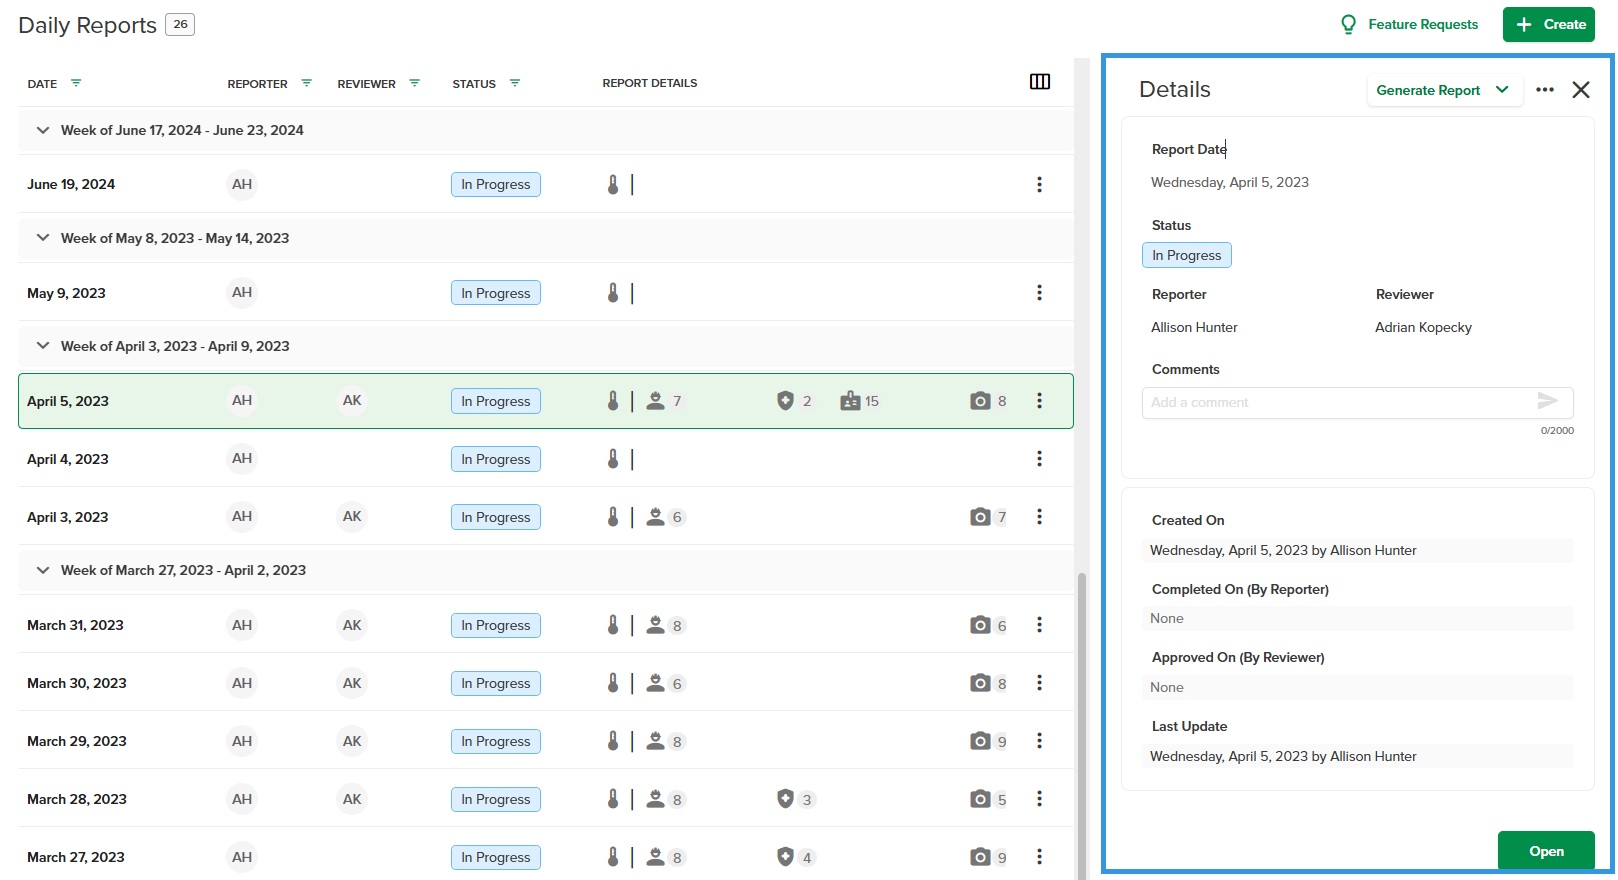
Clicking once on a report opens the editing window.
Daily Report List Columns
The reports are organized by weeks and feature information by columns:
DATE: The date the report was created.
REPORTER: The name of the user who filled out the report.
REVIEWER: The name of the user who reviewed the report to make sure all information was exact and approved it.
STATUS:The status that the report occupies at the present moment.
Completed
In progress
In review
Unassigned
Approved
REPORT DETAILS: Icons of the Daily Report sections with number count next to it.
Weather
Workforce
Equipment
Health & Safety
Visitors
Deliveries
Photos
Observations
Comments
CREATED BY (does not appear by default): The name of the user who created the report.
Filtering the Columns
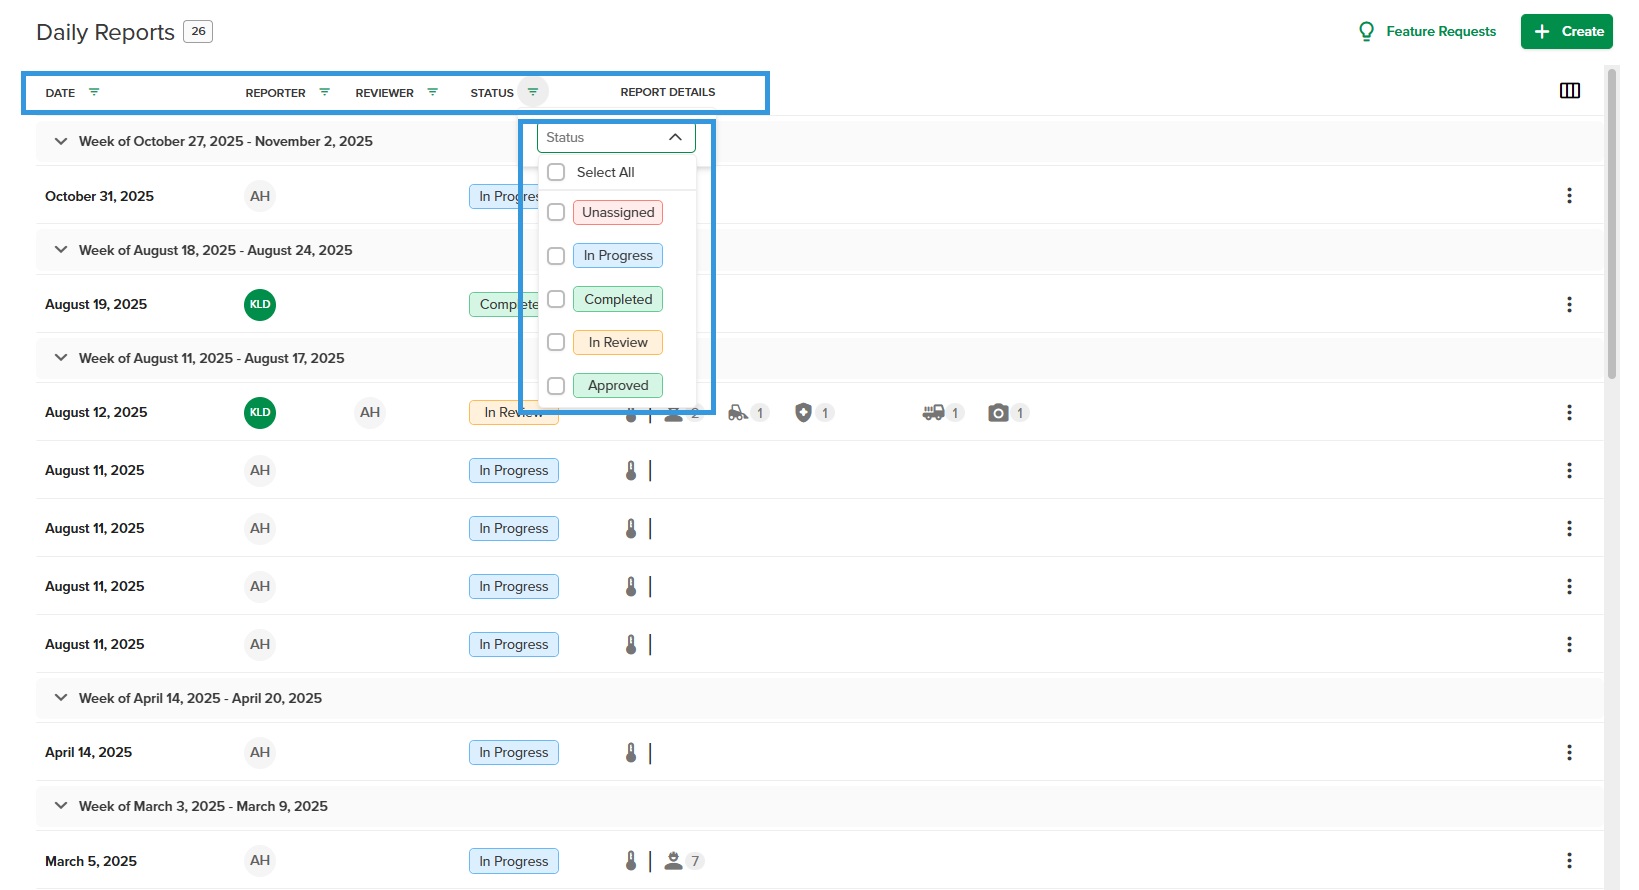
Click the sorting icon next to the Column name.
Select your sorting criteria depending on the column you want to sort.
DATE: Select a date After which, Before which, and/or on the Same date as the report was created.
REPORTER: Select all, multiple, or one user
REVIEWER: Select all, multiple, or one user
STATUS: Select all, multiple, or one status
As you sort the columns, pills showing the filters will appear on the right and the Daily Report list will update automatically.
Hiding and Showing Columns
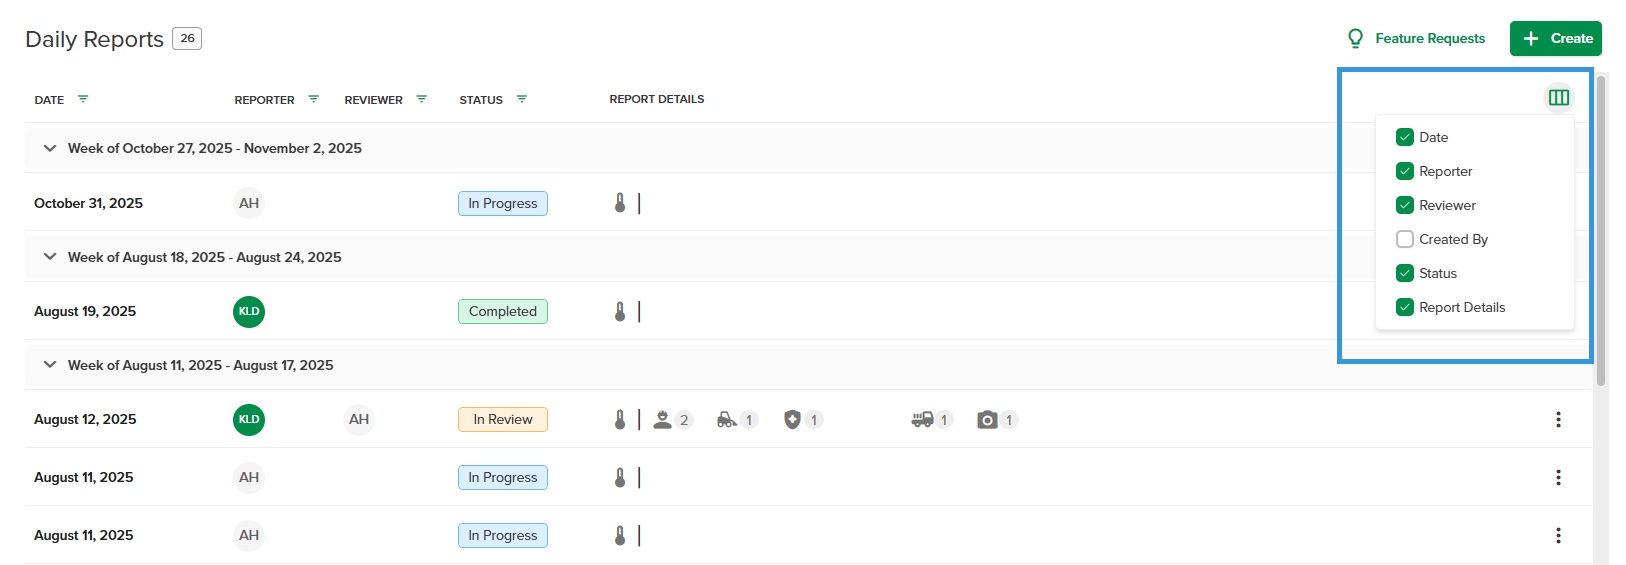
Click the column icon in the upper right corner.
Select or deselect the column that you want to display.
The Daily Report list will update automatically.
Inside the Daily Report
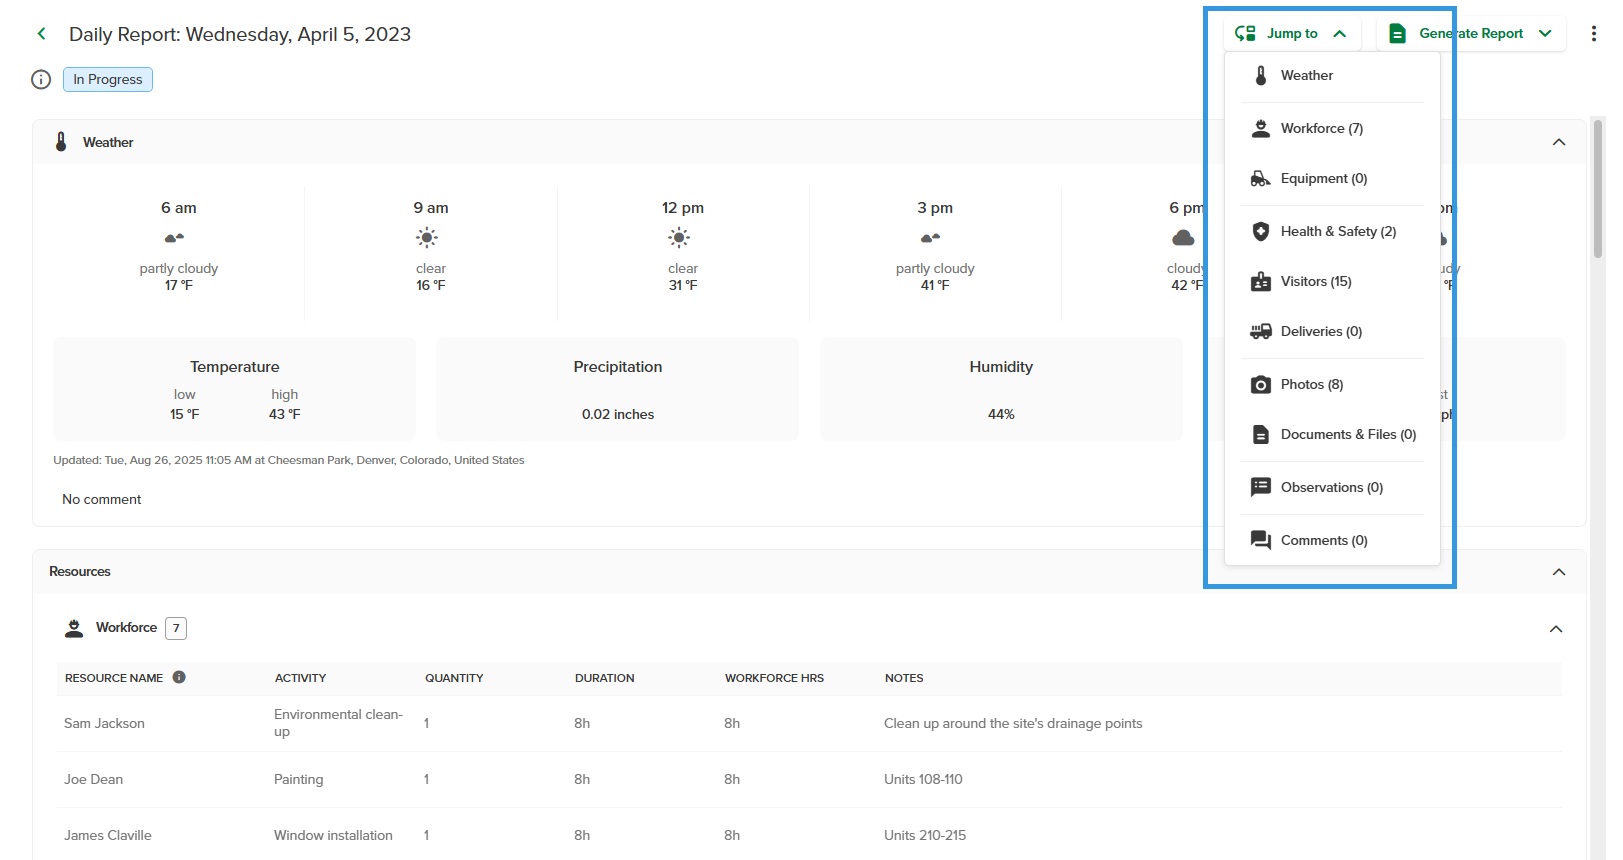
Daily Report Sections
Inside the Daily Report you will see the sections to fill out in order to be able to submit the report. (See the Daily Report Sections article for more details)
Weather
Resources
Workforce
Equipement
Events
Health & Safety
Deliveries
Visitors
Related Items
Photos
Observations
Comments
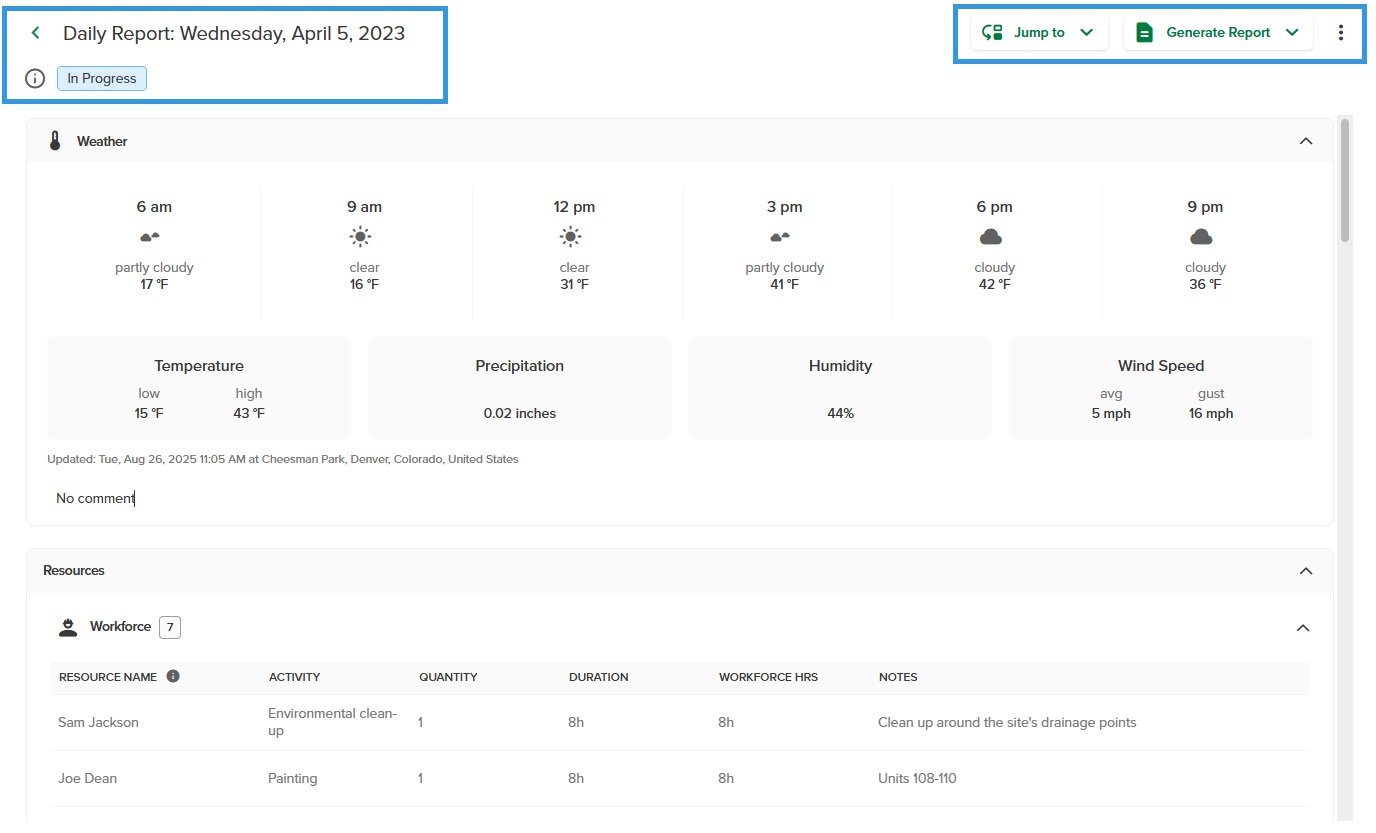
Action Buttons
You will also have access to different action buttons:
Jump to: Jump to a specific section and see how many items have been entered per section
Generate:
Generate PDF
Generate XLS
+ Add: Add a resource or information into a specific section
Three dots:
Copy Link
Collapse All
Expand
Delete
SUBMIT or COMMIT:Once the report is completed
SUBMIT
COMMIT - When the report does have an assigned Reviewer
Create, Submit, and Commit Daily Report Overview
Creating a Report
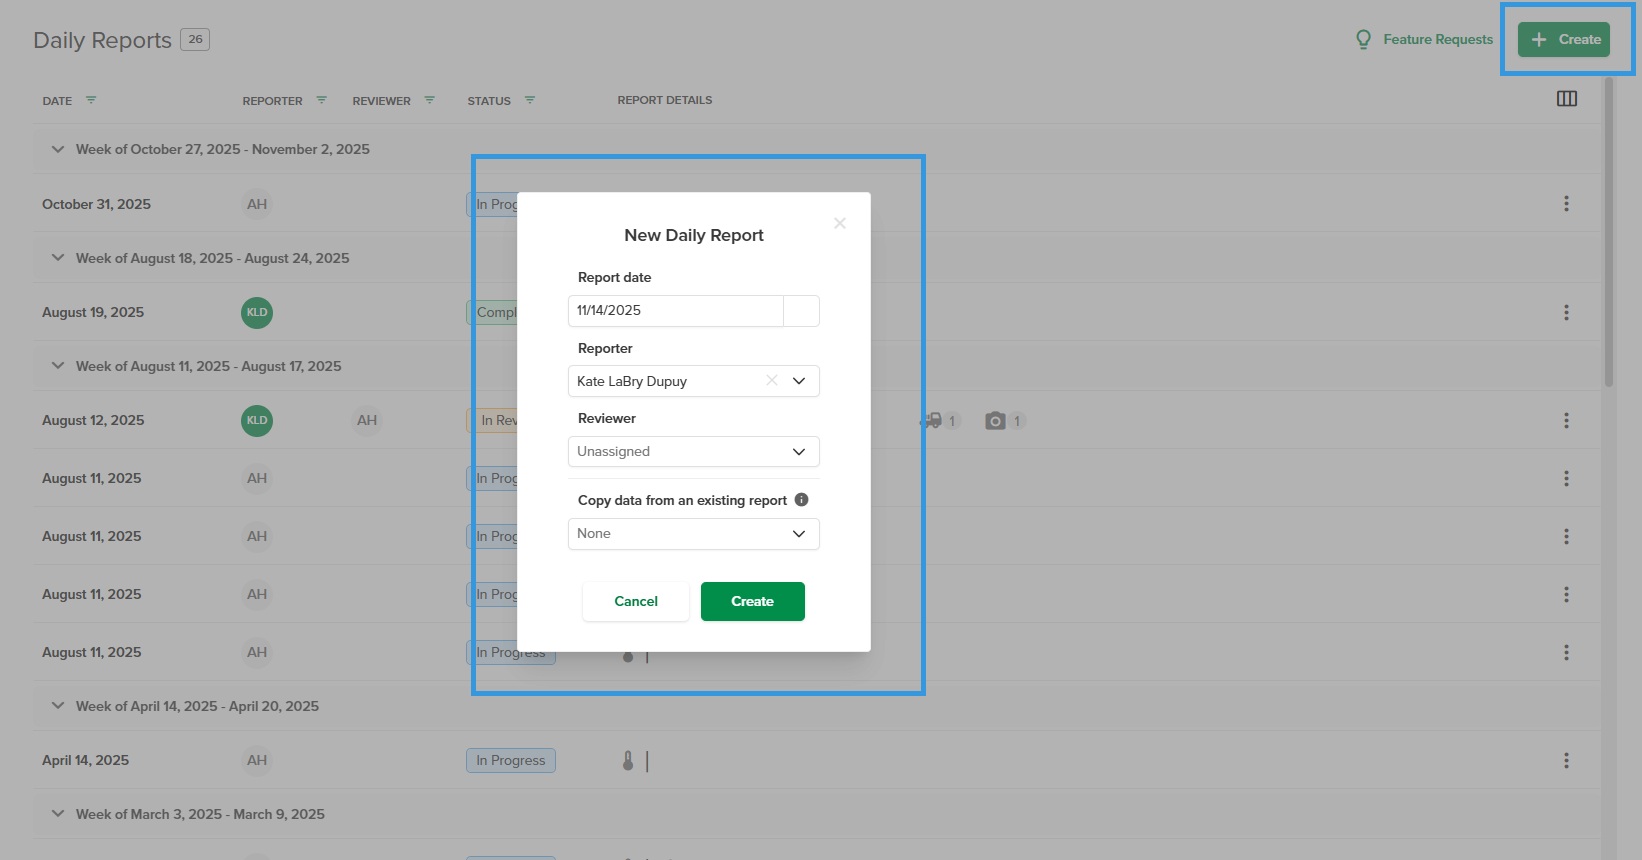
- In the left side navigation menu, select Daily Reports.
- Click the + Create button. When a Daily Report is started, it has the In progress status.
- Fill in the required information:
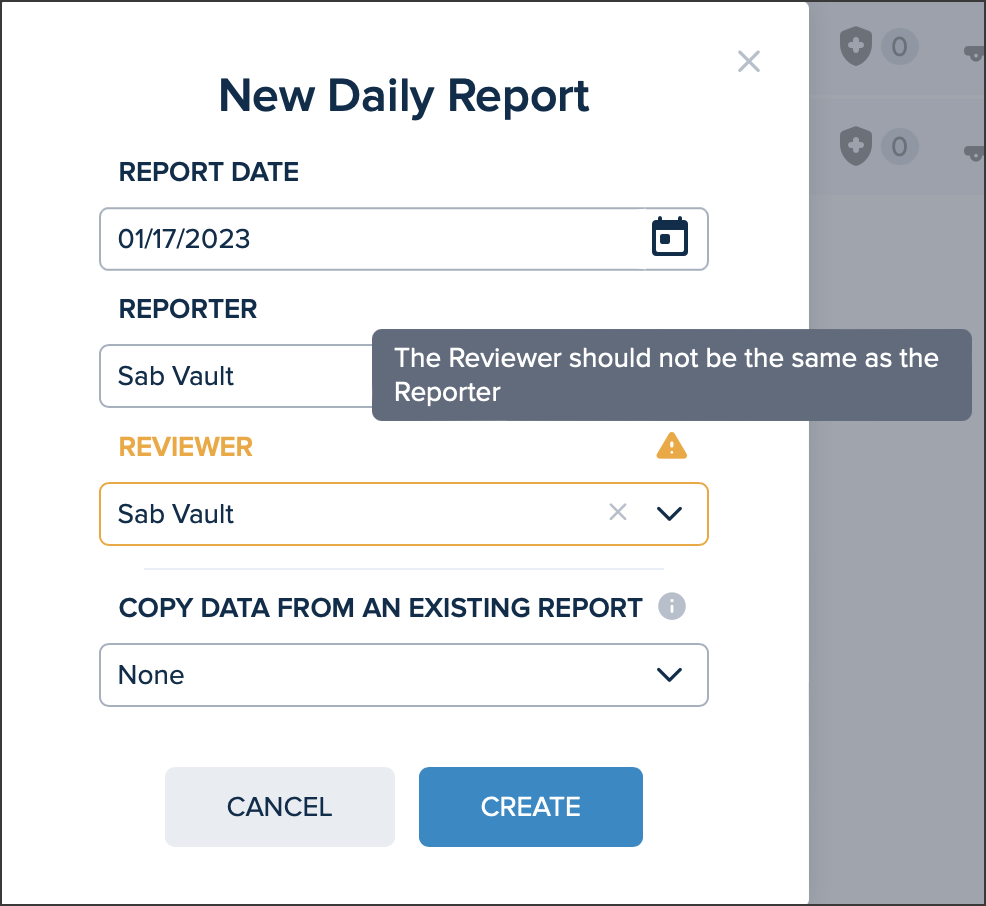
- REPORT DATE: Select the date for the report. By default, the selected date will be today's date. You can either enter the date manually or navigate the calendar to select a date.
- REPORTER: Select the name of the person who will be filling out the report from the drop-down or use the search bar to search for a user.
- REVIEWER: Select the name of the person who will be reviewing the report in order to validate that all the information is correct. The search bar may be used as well to find a specific user. (NOTE: The Reviewer should not the same user as the Reporter. If the same name is selected, a warning message will appear. If no Reviewer is selected, the report will be committed only. (See Committing a Report)
- COPY DATA FROM AN EXISTING REPORT It is possible to use the data from a previous report to not have to fill in all the details manually. Only the data from the workforce gets copied. The report can then be edited in accordance with the specific data for the current report. Select the report to copy from the drop-down.
- Click CREATE.
- The newly created report will appear in the Daily Reportslist.
Committing a Report
The Commit function can be used when you want to create a report without assigning a Reviewer. The Report can still be filled out, but there just won't be a review process, unless a Reviewer is assigned later on, in which circumstance the report can be submitted.
From the Daily Reports list, double click on the report that you want to commit.
Fill in the report and then scroll to bottom and click Commit.
You will be asked to confirm that you want to commit the report and that once committed, the data cannot be edited. Click Commit to proceed.
The report will have the status of Completed.
Submitting a Report
NOTE: A Daily Report must have the In Progress status in order to Submit it.
From the Daily Reports page, double click the daily report or click the three dots and select Open. (NOTE: If the report has already been filled out, clicking on it once will open the editing window where you can directly Submit.)
You will land on the Daily Reports sections page.
Fill in each of the sections of the report. Refer to the Daily Reports Sections article for more details. All sections of the Daily Report must be filled out. A warning message will appear when a section is missing. Check the None checkbox when no information needs to be filled in.
Once all the Daily Report is filled out, click Submit at the bottom of the window. This will change the report status to In review.
NOTE: If the report has already been filled out, clicking on it once will open the editing window where you can directly Submit.
Review Daily Report Overview
Reviewing a Report
Once a Daily Report has been created and submitted by a Reporter, it can be reviewed by the Reviewer. Only the assigned Reviewer has the permission to review the report.
NOTE: When a Reviewer opens a report that has In Review status, it opens it in review mode.
As the Reviewer, you will receive a notification letting you know that they need to review a Daily Report.
You can either Approve or Reject the Daily Report directly into the email, or open it by clicking View in STACK
If you click:
Approve - the report will have Approved status.
Reject - the report will go back to In Progress status and you will receive another email once it has been resubmitted by the Reporter.
View in STACK - it will bring you directly to the report. Go through all the report in order to validate if all the information entered is correct.
Once the report is opened, go down to the Comments section to see if you have any comments to approve or reject. Click the comment and select either Approve or Reject.
At the bottom of the window, click either REJECT or APPROVE.
If you click Reject, enter the reason you are rejecting the Daily Report into the comment section and click REJECT. The Daily Report will go back to In Progress status and your comment will be added to the Comments section.
If you click APPROVE, you can enter a comment (not requited) and click APPROVE. The Daily Report will have the Approved status. if you have added a comment, it will be added to the Comments section
Editing a Report
From the Daily Reports list, click once on the report that you want to edit.
Apply any required changes and close the window by clicking the X in the upper right corner. Changes can be applied to the following fields:
NOTE: the fields that are available to edit will depend on your role in STACK. (See the Daily Reports Permission by Role article)REPORT DATE
REPORTER
REVIEWER
Add a comment (click the arrow to send)

The changes will be reflected in the columns of the Daily Report list.
Deleting a Report
There are three ways to delete a Daily Report. First from the Daily Reports list page, the second from the Editing window, and the third from inside the Daily Report itself.
From Daily Report List
From the Daily Reports list, click the three dots and select Delete.
You will be asked to confirm if you want to permanently delete the Daily Report. Click Yes to proceed.
The Daily Report will no longer appear in the List of Daily Reports.
From the Editing Window
From the Daily Reports list, click once on the report you want to delete.
Click the three dots and select Delete.
You will be asked to confirm if you want to permanently delete the Daily Report. Click Yes to proceed.
The Daily Report will no longer appear in the List of Daily Reports.
Inside the Daily Report
From the Daily Reports list, double click on the report you want to delete.
Click the three dots and select Delete.
You will be asked to confirm if you want to permanently delete the Daily Report. Click Yes to proceed.
The Daily Report will no longer appear in the List of Daily Reports.
Next Steps
Now that you have gotten familiar with the the Daily Reports in the Web Portal, you are ready to explore the:
Daily Reports in the STACK Field App
Related Articles
Daily Reports Permission by Role
If you need additional assistance, please Contact Us.
Was this article helpful?