Statistics
- Print
- DarkLight
- PDF
Statistics
- Print
- DarkLight
- PDF
Article summary
Did you find this summary helpful?
Thank you for your feedback!
Key Information
In the Statistics tab, you can view data for a selected project or for your entire organization's projects.
You can view statistic for all users or a specific user, within a selected date range.
And you can view more detailed data on:
Projects
Users
Folders
Documents
Annotations
Issues
Exports
Statistics Overview
Search
NOTE
Only the dates fields are required to make a search, the users selection is optional.
When selecting a date range, please be aware that only the statistics from the 12 previous months can be accessed.
.gif)
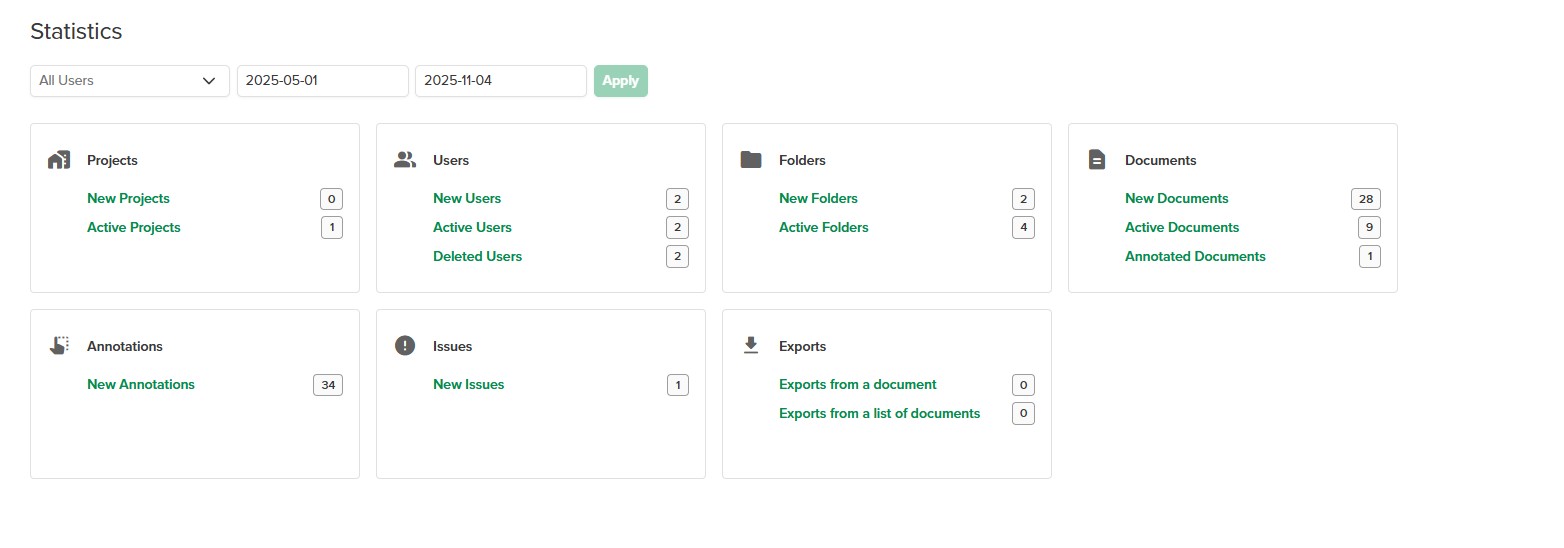
In the PROJECT INFO > Statistics tab, leave All users, or from the dropdown, select the user for which you want to view statistics.
Select a date range for which to view the statistics.
Click Apply.
The statistics for the selected user and date range will be displayed into the statistics tiles.
Click a statistic tile selection to view the details.
Projects
.gif)
In the PROJECT INFO > Statistics tab, leave All users, or from the dropdown, select the user for which you want to view statistics.
Click Apply.
In the Projects tile, select either:
New Projects: View the projects that have been created in the selected date range.
Active Projects: View the project that are or were active during the selected date range.
NOTE
Anytime a user performs an actions on a project such as opening a document, adding an annotation, etc. the project is considered active.
You will find the following information:
New Projects:
NAME: Name of the project.
CREATED BY: Name and email of the user who created the project.
CREATED ON: The project creation date.
Active Projects:
NAME: Name of the project.
CREATED BY: Name and email of the user who created the project.
TOTAL TIME: The total amount of time spend on the project.

Use the users and date range fields to narrow down your search.
Toggle between the Projects statistic windows using the dropdown.
Click the Export button to export the data in an Excel spreadsheet.
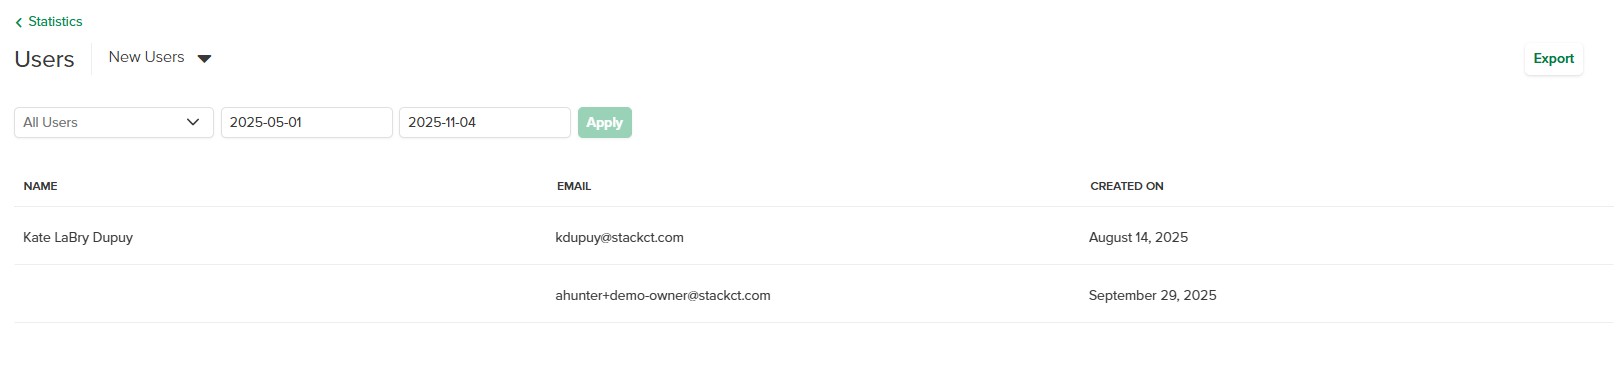
Users

In the PROJECT INFO > Statistics tab, leave All users, or from the dropdown, select the user for which you want to view statistics.
Click Apply.
In the Users tile, select either:
New Users: Users who have been newly created in STACK to work on the selected project.
Active Users: Users who have performed an action on the project during the selected date range.
Deleted Users: Users who were assigned to the project, but were deleted from STACK.
You will find the following information:
New Users:
NAME: The user's name.
EMAIL: The user's email.
CREATED ON: The date that the user was created in STACK.
Active Users:
NAME: The user's name.
EMAIL: The user's email.
LAST SESSION: The date on which the user was last active in STACK on the project.
TOTAL TIME: The total amount of hours and minutes the user has spend in STACK on the project.

Deleted Users:
NAME:The user's name.
EMAIL: The user's email.
DELETED ON: The date on which the user was deleted from STACK.

Use the users and date range fields to narrow down your search.
Toggle between the Users statistic windows using the dropdown.
Click the Export button to export the data in an Excel spreadsheet.
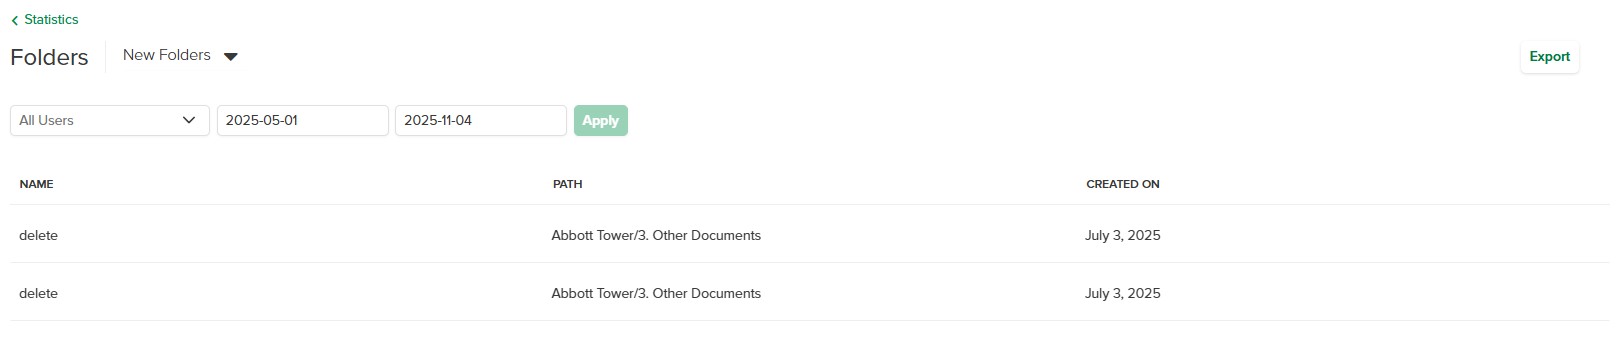
Folders

In the PROJECT INFO > Statistics tab, leave All users, or from the dropdown, select the user for which you want to view statistics.
Click Apply.
In the Folders tile, selects either:
New Folders: Folders that have been created for the project.
Active Folders: The folders where a minimum of one user has opened a document or where an administrator has uploaded a new document.
You will find the following information:
New Folders:
NAME: The name of the folder.
PATH: The breadcrumbs of where the folder is located in the Documents tab.
CREATED ON: The date that the folder was created on.
Active Folders:
NAME: The name of the folder.
PATH: The breadcrumbs of where the folder is located in the Documents tab.
TOTAL TIME: The total amount of time spend by users in the folder.
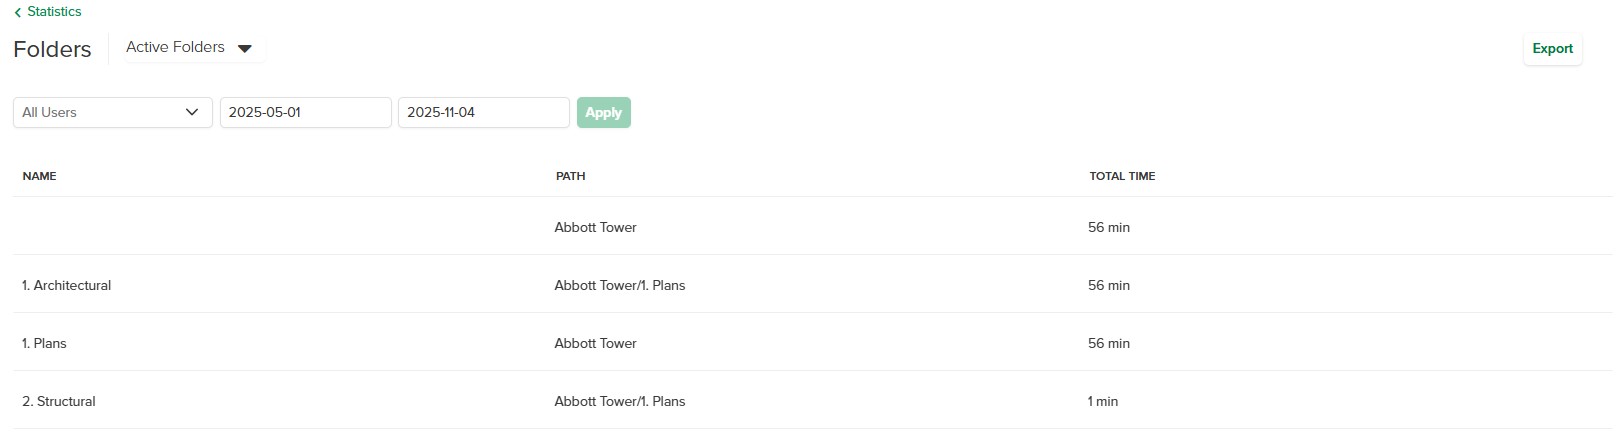
Use the users and date range fields to narrow down your search.
Toggle between the Folders statistic windows using the dropdown.
Click the Export button to export the data in an Excel spreadsheet.
Documents

In the PROJECT INFO > Statistics tab, leave All users, or from the dropdown, select the user for which you want to view statistics.
Click Apply.
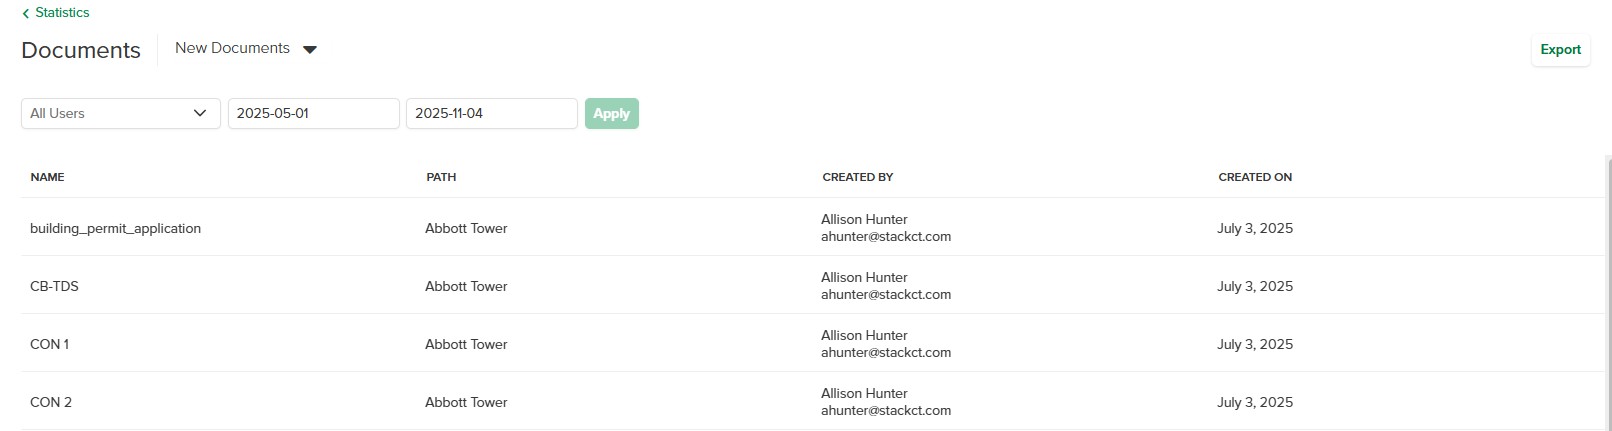
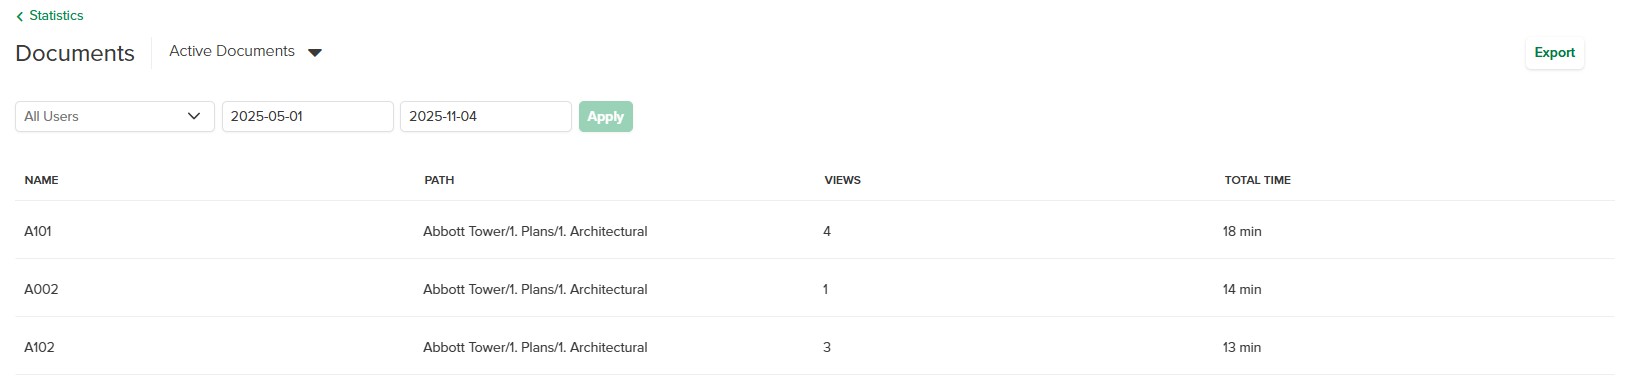
In the Documents tile, select either:
New Documents: Documents that have been added into the project folders.
Active Documents: Documents that have been opened by a minimum of one user.
Annotated Documents: Documents on which annotations have been added in STACK.
You will find the following information:
New Documents:
NAME: The name of the document.
PATH: The breadcrumbs of where the document is located in the Documents tab.
CREATED BY: The name and email of the user who created (added) the document.
CREATED ON: The date the document was added into STACK.
Active Documents:
NAME: The name of the document.
PATH: The breadcrumbs of where the document is located in the Documents tab.
VIEWS: The number of times the document was opened in STACK.
TOTAL TIME: The total time in hours and minutes that the document was opened in STACK.
Annotated Documents:
NAME: The name of the document.
PATH: The breadcrumbs of where the document is located in the Documents tab.
ANNOTATIONS: The number of annotations that have been added onto the document.
Use the users and date range fields to narrow down your search.
Toggle between the Documents statistic windows using the dropdown.
Click the Export button to export the data in an Excel spreadsheet.
Annotations

In the PROJECT INFO > Statistics tab, leave All users, or from the dropdown, select the user for which you want to view statistics.
Click Apply.
In the Annotations tile, select:
New Annotations: Markups that have been added onto the project documents.
You will find the following information:
New Annotations:
TYPE: The type of markup (e.g.: cloud, text, photo, stamp)
COUNT: The number of annotations that have been added onto documents per type.

Use the users and date range fields to narrow down your search.
Click the Export button to export the data in an Excel spreadsheet.
Issues

In the PROJECT INFO > Statistics tab, leave All users, or from the dropdown, select the user for which you want to view statistics.
Click Apply.
In the Issues tile, you will find the following information:
New Issues: The number of Issues that have been created in the selected project.
NOTE
The New Issues statistic does not lead to another window. You cannot click on it to obtain more information.
Exports
The Export tile provide statistics from exports that have been made through the:
STACK Field App:
By exporting Issues in PDF or Word formats. (See Export Issues)
By Sharing as Full Sheet while in a drawing. (See the Inside Documents section, in the STACK Field App Overview)
By Sharing a link or downloading a document in the document list. (See the Documents section, in the STACK Field App Overview)
Web Portal:
By Downloading As-builts in the Projects tab. (See the ORGANISATION INFO > Projects section, in the Web Portal Overview)
.gif)
In the PROJECT INFO > Statistics tab, leave All users, or from the dropdown, select the user for which you want to view statistics.
Click Apply.
In the Exports tile, select either:
Exports from a document: Exports that have been made by exporting issues, sharing full sheets or downloading As-builts.
Exports from a list of documents: Exports that have been made by sharing a link or downloading a document.
You will find the following information:
Exports from a document:
NAME: The name of the user who exported from a document.
EMAIL: The email of the user who exported from a document
PROJECT: The project name from which there was an export from a document.
COUNT: The number of exports made from a document.
Exports from a list of documents:
NAME: The name of the user who exported from a list of documents.
EMAIL: The email of the user who exported from a list of documents.
PROJECT: The project name from which there was an export from a list of documents.
COUNT: The number of exports made from a list of documents.
Use the users and date range fields to narrow down your search.
Toggle between the Exports statistic windows using the dropdown.
Click the Export button to export the data in an Excel spreadsheet.
Related Articles
To view the statistics related to your Organization, refer to the following article:
If you need additional assistance, please Contact Us.
Was this article helpful?