Workflows in the Web Portal
- Print
- DarkLight
- PDF
Workflows in the Web Portal
- Print
- DarkLight
- PDF
Article summary
Did you find this summary helpful?
Thank you for your feedback!
Key Information
The Workflows feature is only available with the STACK | Build & Operate Pro-Package. For further information, visit our pricing page.
Workflows are any process or document type that the field team needs to manage or keep track of. Refer to the Workflow Types section for more information.
Workflows can be used to initiate, track and resolve standard company items so that:
The work is completed
You have a detailed project record in one location
The information is on file so you can refer to it in the future
Workflows Overview
See below for instructions to:
Examples of Uses for Workflows
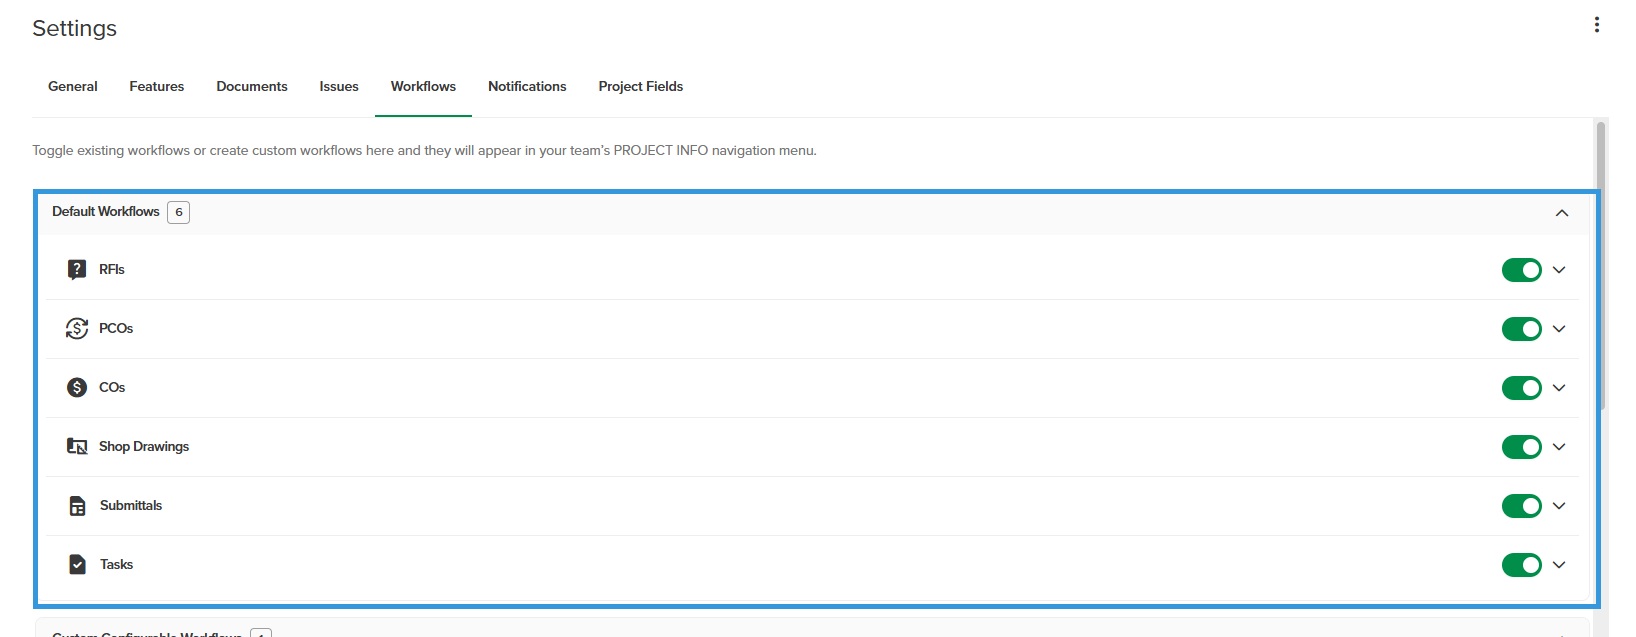
Default Workflows
Workflow Statuses
Default Workflow Statuses
Custom Workflows
Custom Workflow Statuses
Editing a Workflow
Deleting a Workflow
Workflow Sections
General
Description
Comments
Related Items
Action Buttons
Generate XLS
+ Create
Filter and Search
Hiding and Showing Columns
Workflow List Columns
Important History Limitations
Enable Workflows
Customers with the STACK | Build & Operate Pro-package will automatically get Workflows. If you are not yet a Pro customer, contact our Customer Success team to ask to start today.

To enable Workflows on a project, in ORGANIZATION INFO > Projects click the three dots next to a project.
NOTE
If you have the Pro-package, when creating a new project (+Create New Project), Workflows will automatically be enabled.
When clicking the three dots, click Edit project.
Go the FEATURES tab.
Toggle the Workflows button.
Click SAVE PROJECT.
Workflow Types
Workflows are not restrictions when it comes to moving from status to status. Workflows can occupy any status in any order and can revert to a previous status if required.
Although, Draft and Open statuses have a more editable appearance as Closed and Void have a more closed appearance while still being fully editable.
Default Workflows
Default Workflows are workflows that are already built-in STACK and have a set of special predefined statuses.
The Default workflows are the following:
Requests for Information (RFIs)

Change Orders (COs)

Potential Change Orders (PCOs)

Shop Drawings

Submittals

Tasks
.png "TasksIcon(1).png")
Workflow Statuses
Status types are used within STACK to categorize statuses so that items act correctly and intuitively in the system.
Draft: Items that have been started, but need more information to be acted upon.
Open: Items that are being worked on.
Closed: Items that are finished.
Void: Items that are no longer necessary.
Drafted | Opened | Closed | Voided | |
|---|---|---|---|---|
Default status type when an item is created | X | |||
Item is not numbered | X | X | ||
Item is numbered the first time it is moved to this status type | X | X | ||
A Title is required to move to this status type | X | X | ||
*Opened date is added when it is moved to this status type | X | |||
*Closed date is added when it is moved to this status type | X | |||
The fields visually look active | X | X | ||
The fields visually look inactive (but are still editable) | X | X | ||
All emails are sent | X | X | ||
Only comment and report emails are sent | X | X | ||
Required for all items to delete a workflow type | X |
*If an item is moved to an open or closed status type more than once, the Opened and closed dates will reflect the last date it entered that status type.
All these statuses have the same fluidity as the custom workflows as they can all move from any status in any order.
Default Workflow Statuses
Workflow | Draft Statuses | Open Statuses | Closed Statuses | Void Statuses |
Request for Information (RFIs) |
|
|
|
|
Change Orders (COs) |
|
|
|
|
Potential Change Orders (PCOs) |
|
|
|
|
Shop Drawing |
|
|
|
|
Submittals |
|
|
|
|
Tasks |
|
|
|
|
Examples of Uses for Workflows
|
|
|
|
|
|
|
|
|
|
|
|
|
|
|
|
|
|
|
|
|
|
|
|
|
|
|
|
Custom Workflows

What process or documents does your team need to manage?
In addition to the default STACK Workflows, you can add as many Workflow types as your team needs.
Custom Workflow Statuses
Workflow | Drafted | Opened | Closed | Voided |
Custom |
|
|
|
|
<-----------------------------------------------------------------------------------------------> The workflow is fluid, it can move back and forth to any status | ||||
Creating your Own Statuses

Under Custom Configurable Workflows, click +Add status.
Type in the NAME of the New status.
Double-click on the STATUS TYPE and select from the dropdown:
Drafted
Opened
Closed
Voided
Double-click on the COLOR and select from the dropdown:
Grey
Blue
Yellow
Orange
Brown
Purple
Red
Teal
Green
Silver
Click anywhere beside the new status.
You can reorder the statuses by clicking the six dots on the left of a status, dragging and dropping into the new location.
You can delete a status by clicking the three dots on the right of the status and selecting Delete row.
Add a Workflow

Click the three dots next to the project for which you want to add a Workflow.
Click Edit project.
Select the WORKFLOW tab.
In the New Workflow section, fill in the following:
WORKFLOW NAME (SINGULAR): The name of the workflow how it will appear in emails.
WORKFLOW NAME (PLURAL): The name of the workflow how it will appear in the STACK navigation menu and in emails.
WORKFLOW PREFIX: The prefix added to the automatic numbering of the workflow in STACK.
To add more workflows, click +Add workflow and this will add another workflow section to fill in.
Click SAVE PROJECT.
The new workflow will appear in the left-side navigation menu.
Editing a Workflow
Click the three dots next to the project for which you want to add a Workflow.
Click Edit project.
Select the WORKFLOW tab.
Click the dropdown arrow next to the workflow you want to edit.
Apply any required changes.
Click SAVE PROJECT.
Deleting a Workflow Type
You can delete a Workflow type that:
Doesn’t have any items associated with it
All items in the Workflow are set to a Voided status type.
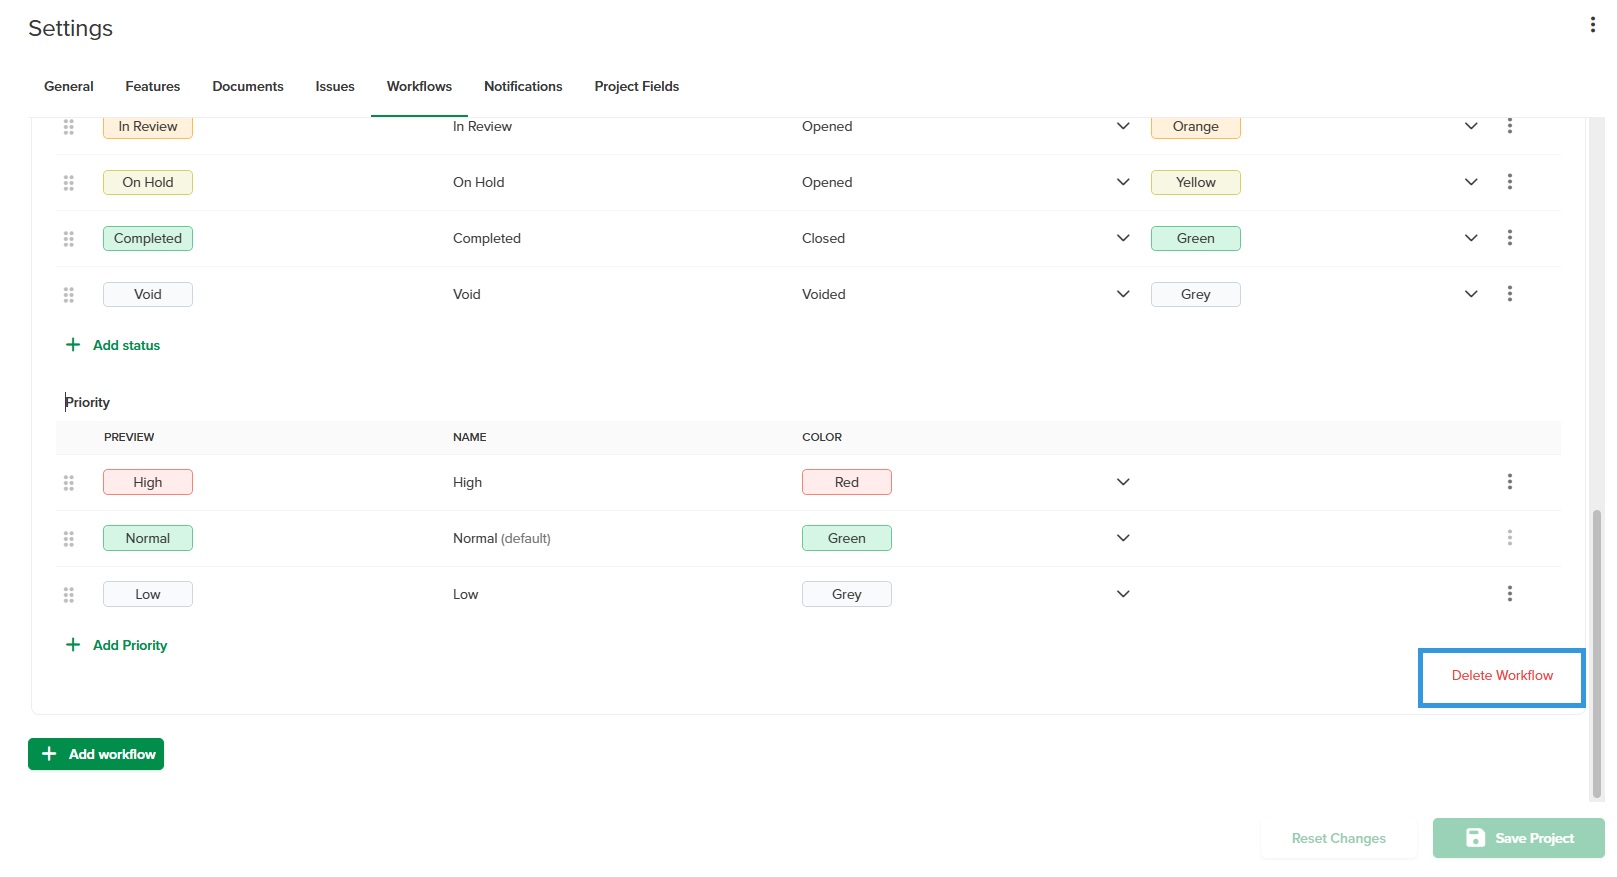
Click the three dots next to the project for which you want to add a Workflow.
Click Edit project.
Select the WORKFLOW tab.
Click the dropdown arrow next to the workflow you want to delete.
Click Delete Workflow.
Click YES, to confirm that you want to delete the workflow permanently.
Click SAVE PROJECT.
The deleted workflow will no longer appear in the left-side navigation menu.
Determine which Workflows Appear in Left-side Navigation
Workflows can be toggled off so they don’t appear in the left-side navigation menu. They can be toggled back on again at any time.
Create a Workflow Item
After adding a workflow type to the project, the new workflow type will appear in the left-side navigation menu. From there, a workflow item can be created in that category.

Click the workflow type in the left-side navigation menu for which you want to create a workflow.
Click +Create.
This will bring you to the Workflow Item View window.
The workflow will have a Draft status when first created and will be given an automatic number with the prefix and four zeros.
Fill in the sections described below.
Workflow Sections
General
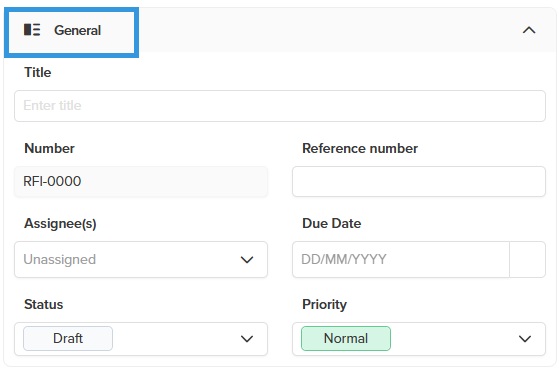
Title: Give a descriptive title to the workflow item.
Number: The workflow number is given automatically and cannot be changed. It will change automatically when passing to an Opened or Closed status type.
Reference number: Add any numbering system that may be required by your organization.
Assignee(s): Select which user(s) to assign the workflow item to.
Due Date: Click the calendar and select the date at which the process or issue must be resolved.
Status: The current status of the workflow item. Note that, in order to change the item to an Opened or Closed status type, the item must have a Title
Priority: The priority level you want to give to the Workflow Item.
Low
Normal
High
Description
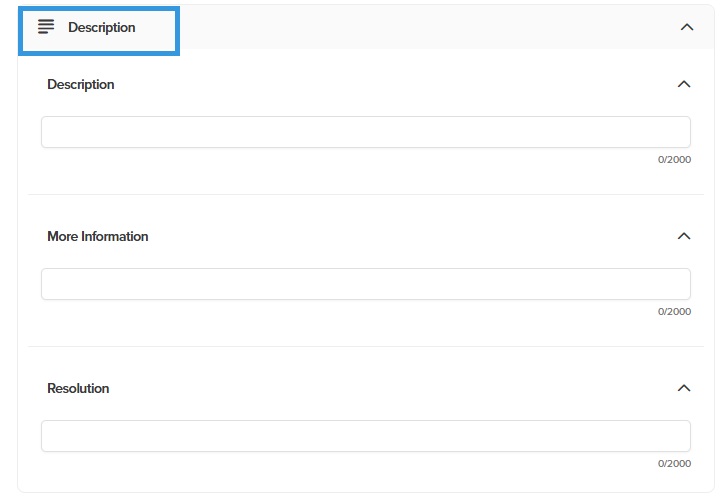
Description: Enter a complete description for the workflow item.
More Information: Add any relevant information relating to the process or issue raised in the workflow.
Resolution: Enter details about how the process or issue has been resolved and any other details relating to the resolution. These fields are flexible and can be used for different content, based on the different Workflow types. For example, for an RFI, Description should include the question and Resolution should include the answer. In a CO example, Description can be used for the scope, More Information can be used for the pricing and Resolution can be used for approval purposes.
Additional Information
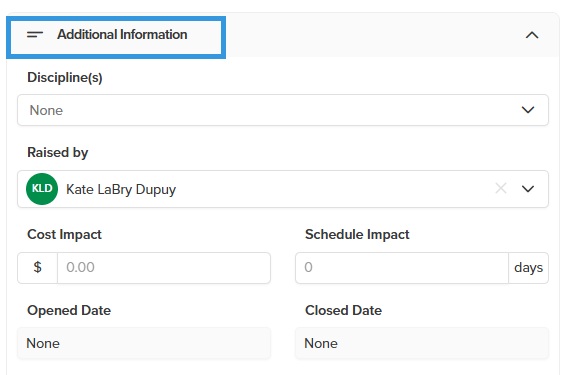
DISCIPLINE(S): From the dropdown menu, select one or multiple disciplines. The available disciplines are those listed or added in the Project Fields tab when the project was created.
RAISED BY: Choose the name of the user who initiated the workflow item. This defaults to the user entering the item, however it can be changed to none or to any user on the project. Note that the Viewer and Reviewer can be set as the Raised By person, although they may not be able to see the item.
COST IMPACT: Enter the dollar amount reflecting the cost impact of the workflow item. (Negative values are allowed if needed.)
SCHEDULE IMPACT: Specify the number of days the project will be delayed due to the workflow item. (Negative values are allowed if needed.)
OPENED DATE: Select the date when the workflow item was opened. The Open Date marks the first time a workflow item enters an Open status and remains fixed despite any subsequent status changes. If an item is closed without ever being in an Open state, the Open Date will be the same as the Closed Date.
.png)
CLOSED DATE: Select the date by which the workflow item is expected to be resolved. The Closed Date records the last time a workflow item transitions to a Closed status. This date remains unchanged if the item shifts between different Closed statuses. If the item moves from a Closed status to Draft, Open, or Void, the Closed Date is removed.
.png)
Comments
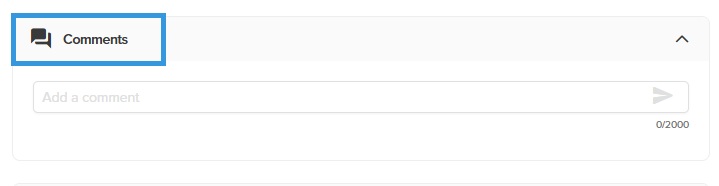
Comments: Comment about the Workflow. This is where a back-and-forth discussion about the item can happen.
To add a new comment about the Workflow itself, enter your information in the Add a comment field. You can enter multiple lines of comments.
Click the arrow to send.
The new comment will be added into the Comments section including the following information:
Initials of the user who made the comment
The comment itself
Date and time the comment was made
Related Items

Upload photos: Photos that may be relevant to the Workflow.
Link documents & files: Any documents or file that you have uploaded in the project that may be relevant to the Workflow.
Attach files: Attach any supporting information, submittals and/or drawing to the workflow.
Photos

Click Upload photos.
NOTE
You can upload photos from your computer or from Google Drive, Google Photos, Dropbox, OneDrive, and Box. The supported file extensions are .png and .jpeg/.jpg, including panoramics.
Select the icon for your desired upload method - local file (from your computer), web camera, the web, Dropbox, Google Drive, Box, or OneDrive - from the gray bar on the left of the upload area.
Drop photo(s) here: Drag and drop your photo file into the box and click Upload. To add multiple photos, click +Add more.
Local photos: Navigate to find the photo that you want and click Upload.
Local Camera: Take a photo with your computer's camera and click Upload. To add multiple photos, click +Add more.
Direct link: Paste the URL of where the photo is located, click Import and then Upload. To add multiple photos, click +Add more.
Google Drive: Connect to your Google Drive and retrieve the photos that you want to add. To add multiple photos, click +Add more.
Google Photos: Connect to your Google Photos and retrieve the photos that you want to add. To add multiple photos, click +Add more.
Dropbox: Connect to your Dropbox and retrieve the photos that you want to add. To add multiple photos, click +Add more.
Onedrive: Connect to your Onedrive and retrieve the photos that you want to add. To add multiple photos, click +Add more.
Box: Connect to your Box and retrieve the photos that you want to add. To add multiple photos, click +Add more.
Click Done.
A thumbnail of the photo(s) will appear in the Related Items section.
Click the three dot menu to:
Edit: Add Notes.
Remove
Documents & Files
Click Link documents & files.
Navigate to the folder where the document(s) or file(s) is located. Check the folder, document(s), or file(s).
Remove any unwanted document(s) or file(s) by clicking the X next to it in the file selected section.
Click LINK.
A thumbnail of the document will appear in the Related Items section.
Click the three dot menu to:
Edit: Make edits to the Document details. Only NOTES can be edited.
Download: Download the document or file to your internet downloads.
Open Linked Document: This brings you to the current version of the document or file in the Documents tab, in the document viewer.
Remove: Allows removing the document from the Workflow.
Files

Click Attach Files.
NOTE
You can Attach Files from your computer or from Google Drive, Google Photos, Dropbox, OneDrive, and Box.
Select how you want to upload the file(s):
Drop file(s) here: Drag and drop your file into the box.
Local files: Navigate to find the file that you want and click Upload.
Camera: Take a photo with your computer's camera and click Accept.
Direct link: Paste the URL of where the file is located, click Import.
Google Drive: Connect to your Google Drive and retrieve the files that you want to add. To add multiple files, click +Add more.
Google Photos: Connect to your Google Photos and retrieve the files that you want to add. To add multiple files, click +Add more.
Dropbox: Connect to your Dropbox and retrieve the files that you want to add. To add multiple files, click +Add more.
Onedrive: Connect to your Onedrive and retrieve the files that you want to add. To add multiple files, click +Add more.
Box: Connect to your Box and retrieve the files that you want to add. To add multiple files, click +Add more.
To add multiple files, click +Add more.
To remove files from the upload, click the trash can next to the files, or click Clear to remove all files.
Click Upload.
Click Done.
A list of the files will appear in the Related Items section.
Click the three dot menu to:
Download
Delete
Action Buttons
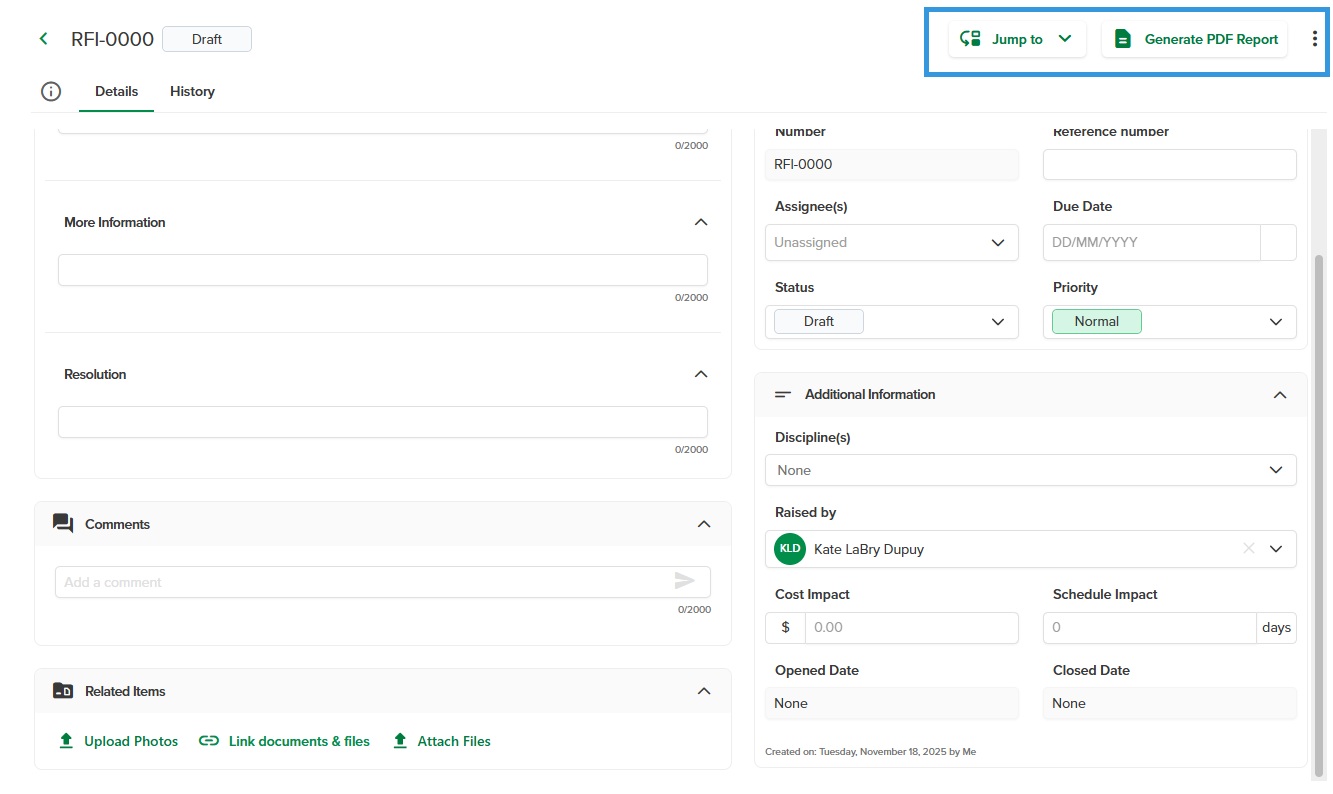
Jump to: Jump to a specific section of the Workflow. Click to drop down to access the Workflow sections.
Generate PDF Report: Allows generating a PDF report of the Workflow item which can be downloaded by clicking the download arrow. If a plan has been attached to the workflow, it will be included in the PDF download. The top left section of the Workflow PDF export will include your company name and logo, address, phone number and well as the projects’s logo and address
Three Dot Menu:
Copy Submittal Link: Allows copying the Workflow link to be pasted into another browser tab or window.
Collapse All: Allows collapsing all Workflow sections which can then be individually expanded by clicking the dropdown arrow.
Expand All: Allows expanding all workflow sections after they have been collapsed.
Workflow Items List Page
Once a Workflow Item is added to the Workflow category, it's added to the Workflow List.
When you select a Workflow Category from the left navigation menu, you land on the Workflow List page, which gives you a quick preview of how many Workflow items have been created.
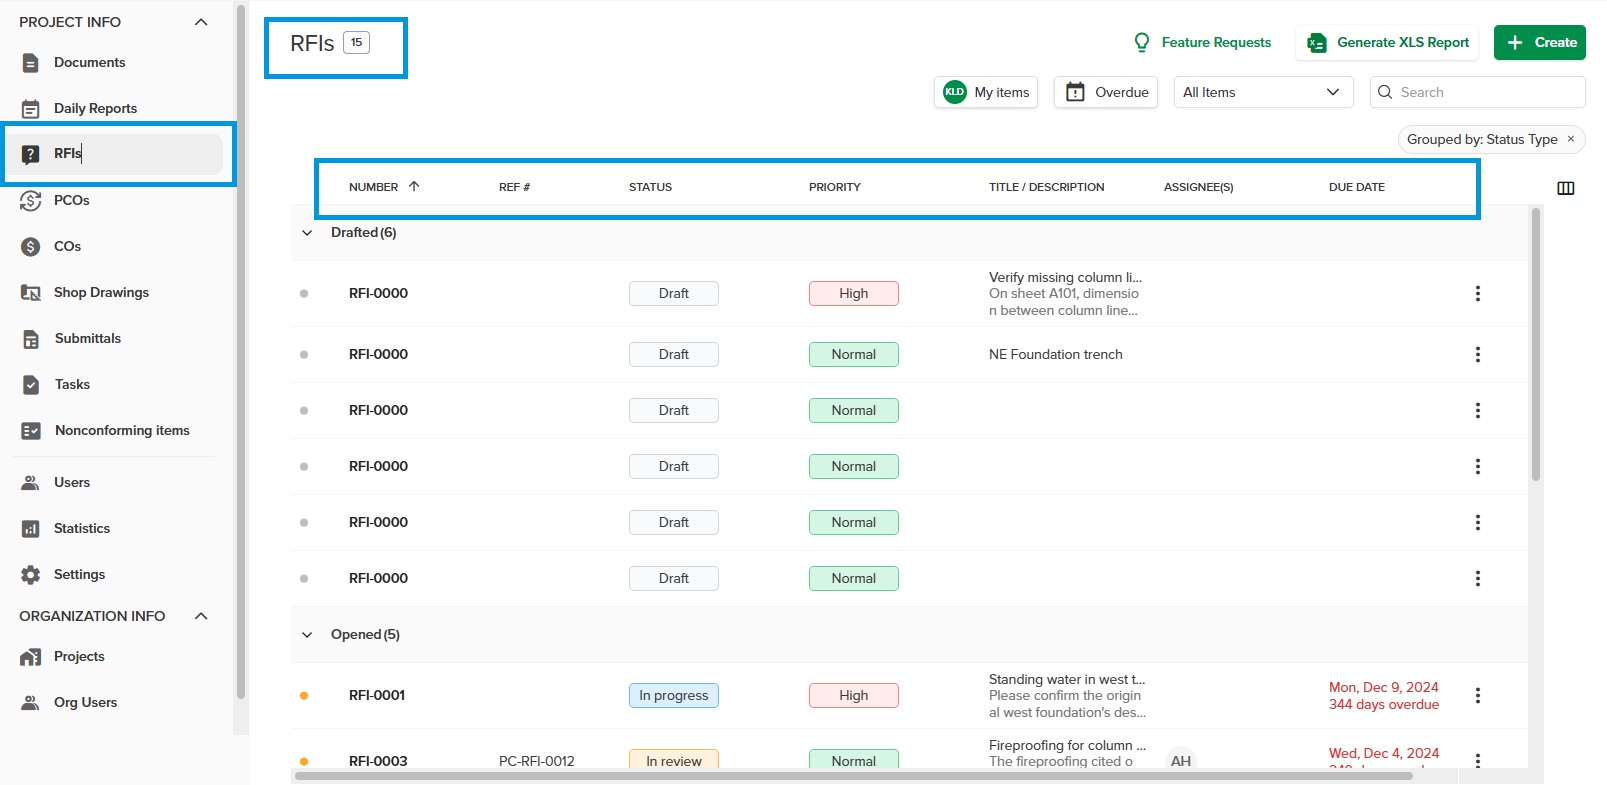
Double clicking on an item will open it.
Clicking the three dots or right clicking on one of the Workflow Items allows:
Opening the Workflow Item
Copying the Submittal Link
Generating a PDF Report
.jpg)
Clicking on a Workflow item allows opening it.
Generate XLS
Allows generating a XLS Report of the Workflow Item and downloading by clicking on the download arrow.
+ Create
Allows creating a new Workflow Item. See the Create a Workflow Item section for details.
Filters and Search
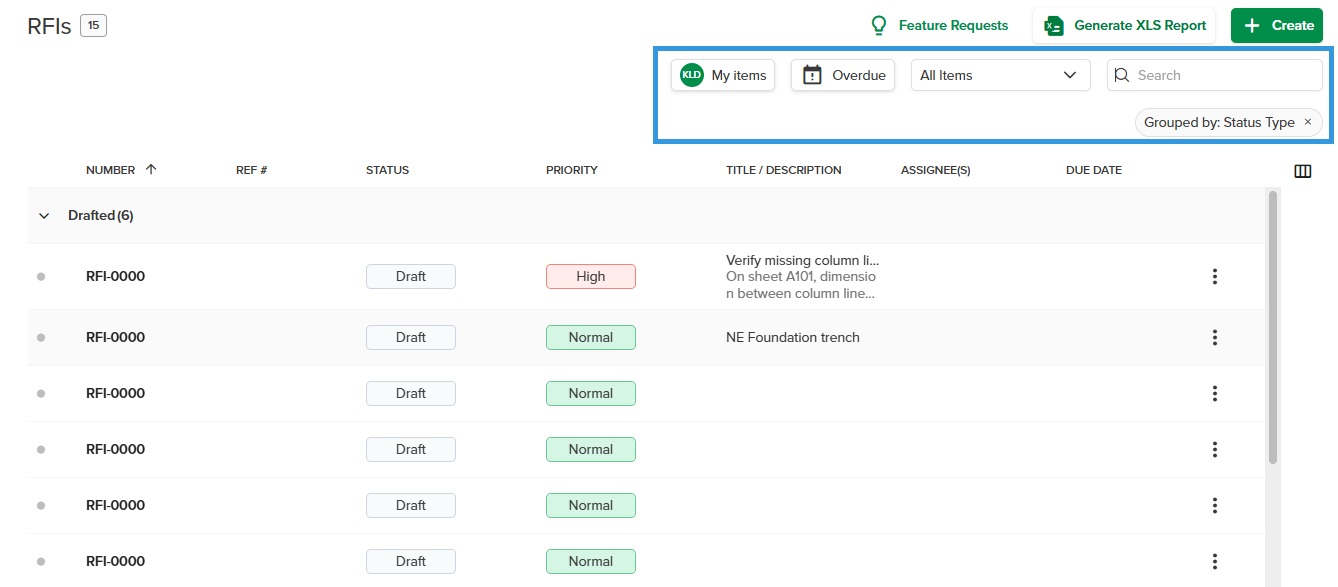
You can use quick filters to display only what you select:
My items: The Workflow items that have been assigned to you.
Overdue: The Workflow items that are already overdue.
All Item:
Save View As: Save the current view including:
NOTE
The saved view will only apply to the current user on the specific current Workflow item, and in the Web Portal.
Grouping
Filter and search
Shown/hidden columns
Column ordering
Sort order
Column widths
Pinned columns
All Items: All the Workflow Items
Overdue: Only the Workflow Items that are overdue.
Drafts + Open: The Workflow Items that have been created and are either in Draft or Open statuses.
Assigned to me: Workflows Items that are assigned to you.
The List view will update automatically to display only what you have selected.
Use the Search bar to search Workflow items by key words. As you type, the most relevant search results will be displayed.
Hiding and Showing Columns
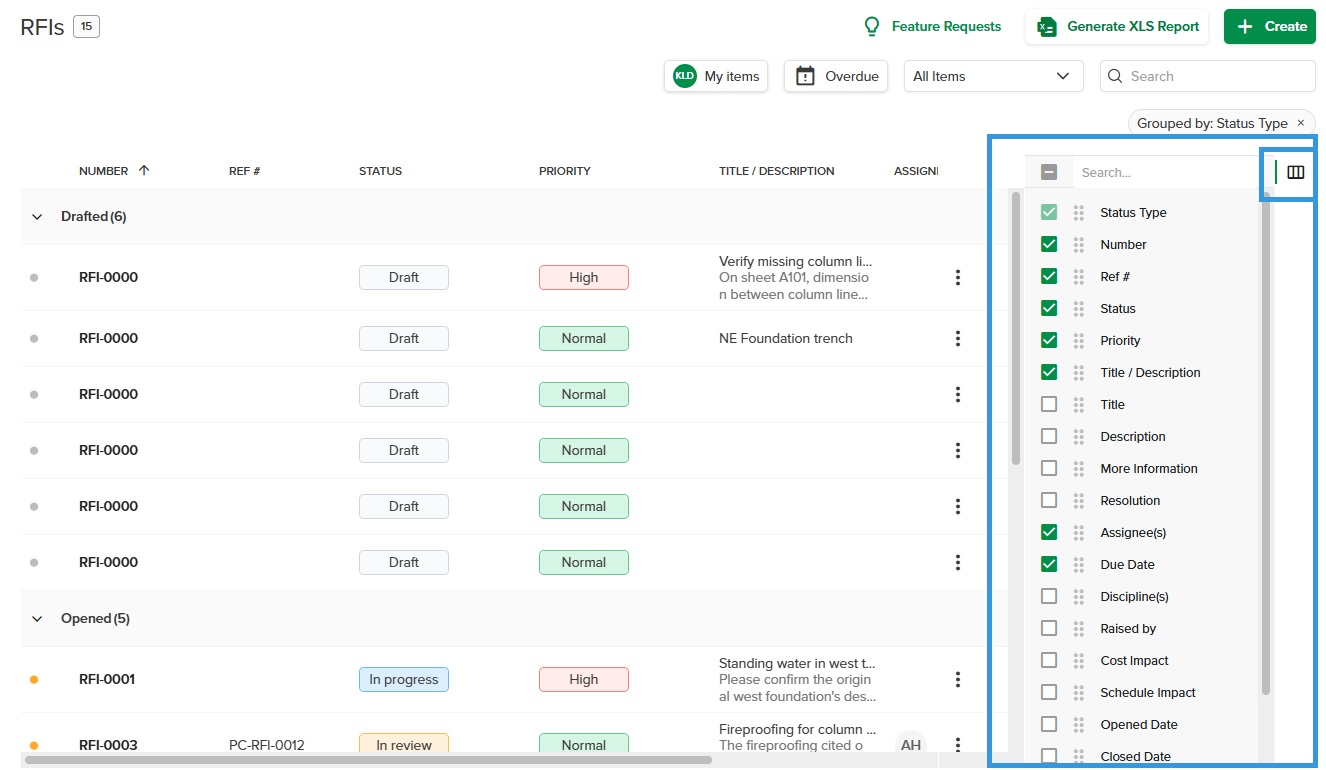
Click the column icon in the upper right corner.
Select or deselect the column that you want to display.
NOTE
Using the dotted icon on the left of the column name, you can drag and drop to change the order of the columns.
The Workflow Item list will update automatically.
Workflow List Columns

STATUS: The current status of the Workflow Item.
NUMBER: The automatic number that was given to the Workflow Item.
REF #: If any was entered, the reference number that was given during creation for the Workflow Item.
TITLE / DESCRIPTION: The Title and the description that was entered during the creation of the Workflow Item.
ASSIGNEE(S): The name of the user to whom the Workflow Item is assigned to.
OPENED DATE: The date that the Workflow Item was most recently moved to a Closed status type.
DUE DATE: The date that the Workflow Item is due to be closed.
CLOSED DATE: If applies, date on which the Workflow Items was closed.
RAISED BY: The name of the user who raised the Workflow Item.
TITLE: The title that was given to the Workflow Item during creation.
DESCRIPTION: The description that was given to the Workflow Item during creation.
MORE INFORMATION: What was entered in the More Information field.
RESOLUTION: Information about how the issue was resolved and that was entered in the Resolution field.
CREATED ON: The date that the Workflow type was created.
CREATED BY: The name of the user who created the Workflow type.
The order of the columns can be changed by dragging and dropping them into the new location. Also, if a column title is dragged outside the list, it will remove it from the view.
Filtering the Columns
When hovering over a column heading, a three dot vertical menu will appear. This allows resizing and pinning columns. The STATUS column also allows Grouping by statuses.
Also, when hovering over a column heading, the following column allows applying filters:
ASSIGNEE(S)
OPENED DATE
STATUS
CLOSED DATE
RAISED BY
CREATED ON
CREATED BY
Check the box for the filter you want applied.
Workflow Item Details
Once you click on a workflow item from the list, it brings you to the information that was entered when the workflow item was created. Edits can be applied in this page and will be reflected in the workflow History. Refer to the Create a Workflow Item section for more details.
.jpg)
Workflow Item History
With workflow History, you can view all updates and modifications that have been made on a workflow items since its creation.
Once you click on a workflow item from the list, click on the History tab next to the workflow item Details.
.jpg)
History Tab Columns
ACTIONS: The description of the change that was made including:
An icon
Subject icons (big)
Icon
Description

Description

Additional Information
.png)
General section items

Comments

Related item - Photos

Related item - Documents

Related item - Files

Configuration items
Action icons (small)
Icon
Description
.png)
Added

Changed

Deleted
The action performed on:
Title
Number
Reference Number
Raised By
Assignee(s)
Due Date
Status
Description
More Information
Resolution
Comments
Photos
Projects Documents
What was changed
DATE: The month, day, year, and time the change was made on the workflow item.
CHANGED BY: The name of the user who performed the change.
Three Dot Menu
Copy History Link: Copy and paste the link to another user so they can open the item’s history information, provided that the user has access.

Important History Limitations
History events for items created prior to the History release date (August 5th, 2024) are correct, but may be incomplete.
When a user returns online, any offline actions they performed are added to the system and are timestamped at that time.
If a project Administrator renames or deletes a Status, Priority, or Discipline while a user is offline and they select the same item, the History action may appear incorrect:
Renamed Items: The History will display the new name, not the name selected during the offline period.
Deleted Statuses and Priorities: The History will revert to the last selected value by the user. If that value has also been deleted, the system will return to the default setting.
Deleted Disciplines: Any selected Disciplines that have been deleted will be removed.
As of September 30th 2024, history events for photos uploaded via the Web Portal are added.
Workflow Emails
NOTE
Workflow emails are not sent to the the user who has triggered the email. Only report emails are sent to the user who triggered it.
Notification emails are always only send once. For example, if both the creator and the “raised by” are the same user, they will only receive one email.
The following table illustrates when and why workflow emails are sent:
Trigger | Sent to | |
|---|---|---|
New workflow item assigned to you | When the workflow item moves to an Open or Closed status type for the first time, and receives a number, AND there is one or more assignees |
|
Workflow item has been reassigned | Anyone changes the assignee (item must be numbered) |
|
New comment on the workflow item | Anyone adds a comment, at any status |
|
A workflow item has changed status | Anyone changes the status (item must be numbered) |
|
A workflow item due date has changed | Anyone changes the due date (item must be numbered) |
|
PDF Generated | Individual user generates a PDF on the mobile App, at any status |
|
XLS Generated | Individual user generates an XLS on the mobile App, at any status |
|
Next Steps
Now that you have gotten familiar with Workflows in the Web Portal, you are ready to explore the:
Workflows in the STACK Field App
Related Articles
If you need additional assistance, please Contact Us.
Was this article helpful?