Documents
- Print
- DarkLight
- PDF
Documents
- Print
- DarkLight
- PDF
Article summary
Did you find this summary helpful?
Thank you for your feedback!
Key Information
The Documents tab is where you create a folder structure to store your documents in STACK.
Drawings and PDF Documents are the document types that can be uploaded into STACK.
Plans can also be uploaded from STACK | Takeoff & Estimating and from Autodesk Vault.
Documents Overview
Folders
Create a Folder
Select Documents.
Click Create a folder.
Enter a Folder Name.
TIP
You can add permissions to the folder by clicking Assign user permissions.
Click CREATE FOLDER.
The new folder will be added to the Documents List.
Rename a Folder
.gif)
Click the three dots next to the folder you want to rename.
Select Rename.
Edit the name.
Click Save.
Permissions on Folders
NOTE
Only the Administrator can add permissions on folders.
.gif)
Click either the three dots next to the folder you want to add permissions to or the padlock icon at the top of the window.
Select Permissions.
Deselect the users for who you don't want to give permission to access the folder.
Click Save.
Move Files and Folders
You can move files and folders within your project. This makes it easier to reorganize your structure as the job progresses, without needing to re-upload documents.
.gif)
Navigate to the file or folder you want to move.
Either right-click next to the file/folder or click the three dots next to the file/folder. To select multiple files/folders, either click the select icon or use ctrl shift on your keyboard.
Select Move.
Navigate to where you want the file/folder to be moved.
Click Move.
NOTE
If the file or folder cannot be moved, an error message will be displayed to inform you of the reason.
- File/folder with the same name- The move to folder is the same as the selected folder
- The folder has revisions that are unpublished
Delete a Folder

Click the three dots next to the folder you want to delete.
Select Delete.
Check the box to confirm that you understand the folder will be deleted with all associated files, markups, and photos.
Click YES.
The folder will no longer be in the Documents List.
Upload Documents
Files can be uploaded from either local storage or connected cloud sources. You can upload Drawings (plans) or Documents to be opened in the web viewer, with PDF as the only supported file type for drawings. To view any other file types the web, you must download them. However, other file types can be viewed in the STACK Field App, with the open with option. STACK | Build & Operate supports multiple file types, including the ones listed below. With the streamlined upload process, drawings and documents can be added together in a single step, even when they are organized into different folders. This reduces the need for multiple uploads, helps maintain folder organization, and improves efficiency when managing frequent updates to project files.
File Type | Extension |
|---|---|
| |
zip files |
|
Office files |
|
Drawing files |
|
Image files |
|
Video files |
|
Scheduling files |
|
Design files |
|
Streamline Upload of Files
.gif)
From the left side navigation menu, select Documents.
Click Upload.
Select Local or Cloud files.
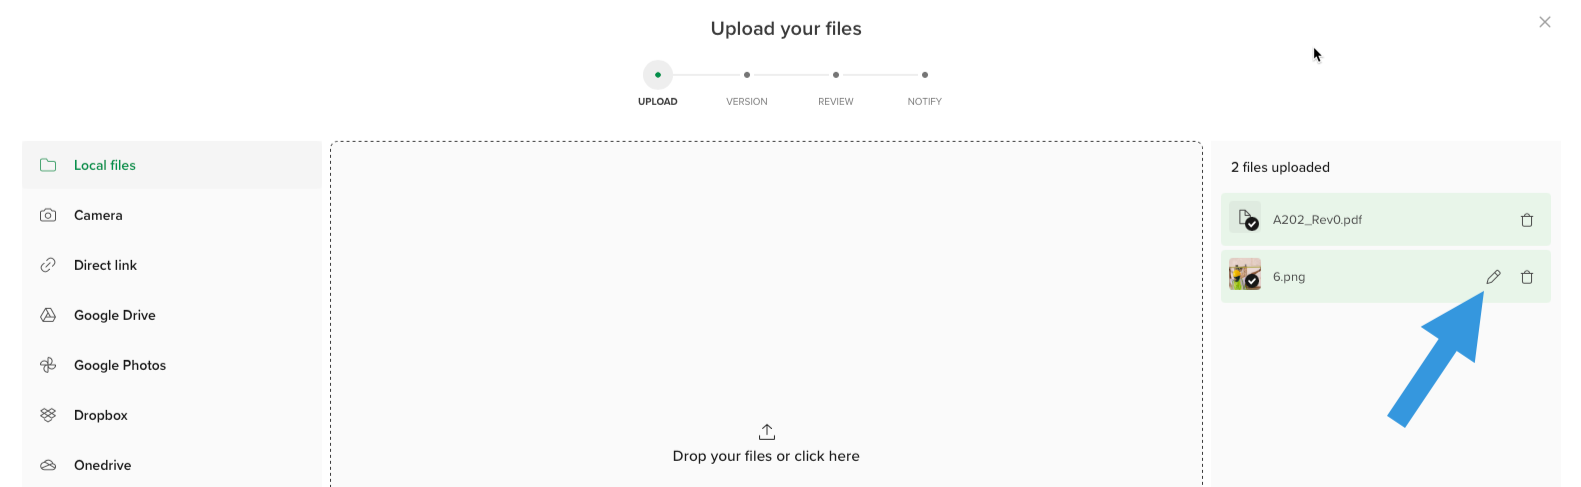
Select the icon for your desired upload method - Local files (from your computer), Camera, Direct link, Google Drive, Google Photos, Dropbox, Onedrive or Box - from the gray bar on the left of the upload area.
For each of the upload sources:
Local files: Drag and drop your file, or click Drop your files or click here to navigate to your file.
Camera: Take a photo with your laptop or computer camera. (You might need to grant permission to take photos)
NOTE
When uploading a photo, you have he possibility to edit the image. Click the pencil icon to rotate, crop, or flip.
Direct Link: Enter or copy and paste the link and click Import.
Google Drive: Connect to your Google Drive and retrieve the required drawings/documents.
Google Photos: Connect to your Google Photos and retrieve the required images.
Dropbox: Connect to your Dropbox and retrieve the required drawing/documents.
Onedrive: Connect to your OneDrive and retrieve the required drawing/documents.
Box: Connect to your Box and retrieve the required drawing/documents.
To remove a drawing or document, click the trash can icon next to the item in the right gray bar.
Click NEXT.
On the left side panel of the next screen, select a file(s) by checking the box.
On the right side panel, navigate to where you want to save the file(s).
Click the green arrow to make the transfer.
Repeat this process to save files in different locations.
Select if the file is either a:
Drawing: A large-format PDF of a construction document sheet that includes a plan, elevation, detail, etc.
Document: A supporting document like specifications, submittals, construction agreements, SOWs, bill of quantities, etc.Click Next.
Create a version set by entering the Name.
Select the issue Date and Time.
Click NEXT. If you wish to upload the document at a later time, click FINISH LATER. The file that you send to FINISH LATER can be found in Upload history.
The files will then upload.
If STACK | Build & Operate finds the NAME and TITLE, it will enter it automatically as it uploads.
If STACK does not find them, click in the field and select the correct entry.Alternatively, you can click the THUMBNAIL to view the drawing and extract the information.
Locate the NAME of the drawing and drag and drop the Name extracting tool.
Stretch the box so it catches the complete name.
Do the same for the TITLE and Revision number.
Click REVIEW EXTRACTION.
If the information extracted is correct, click APPLY.
If necessary, attach any relevant TAGS to your file.
Click NEXT.
Select what colleagues or category of colleagues you want to notify about the document. You can also enter notes in the OPTIONAL NOTES section.
Click PUBLISH.
While the file(s) is uploading to the folder, a clock icon will be shown on the file type icon. Once it has been fully uploaded, the icon will disappear.
Upload from STACK | Takeoff & Estimate
If you have a subscription with STACK pre-construction, you can upload files directly from STACK.
In STACK | Takeoff & Estimate, add any notes, legends or other information because once uploaded in STACK | Build & Operate, you will not be able to edit it. It is a one-time transfer of static data and data is not synced moving forward.
Only the following STACK | Build & Operate user roles can upload STACK | Takeoff & Estimate plans to STACK | Build & Operate:
Owner
Administrator
Power Collaborator +Documents
NOTE
This feature is not supported in Apple Safari. You can use Google Chrome, Firefox, or Edge to upload your STACK files.
.gif)
From the left side navigation menu, select Documents.
Click Upload.
Select Takeoff & Estimate.
If not already, Login To Stack using your credentials.
From the Statuses dropdown, select the status(es) of the project you are searching for.
In STACK, select the project from which to import the plans.
On the the left side panel of the next screen, select a file(s) by checking the box.
On the right side panel, navigate to where you want to save the file(s).
Click the green arrow to make the transfer.
Repeat this process to save files in different locations.
Select if the file is either a Drawing or a Document by checking the box.
Click Next.
The version set and the date will already be populated. You can edit them if needed.
Click NEXT.
Once the document is uploaded, click NEXT.
Click the THUMBNAIL if you need to extract the Name, title or revision number.
Select what colleagues or category of colleagues you want to notify about the document. You can also enter notes in the OPTIONAL NOTES section.
Click PUBLISH.
While the file(s) is uploading in the folder, a clock icon will be shown on the file type icon. Once it has been fully uploaded, the icon will disappear.
Autodesk Vault
Export Drawing from Autodesk Vault
Create the project and folders you want to use in STACK | Build & Operate before beginning.
Open Autodesk Vault Desktop Utility.
Select the DWG or PDF files you want to send to STACK | Build & Operate. (DWG files will be converted to PDFs.)
Right click and select Export to STACK.
Login to STACK | Build & Operate when prompted.
Click Next when you see the Successfully Logged in message.
Select the STACK Project with which you want the files associated and click Next.
Select the STACK Folder where you want the files saved and click Export.
Upload History
It is possible to view the document upload history with the History icon, which displays the number of documents that have been uploaded.

- From the left side navigation menu, select Documents.
- Click the History icon.
- If needed, apply a status filter or use the search bar to find the document. As you type, the most relevant results will be displayed.
- The document Upload History will be displayed with the following information:
- FOLDER PATH: Breadcrumbs of where the document is located.
- UPLOADED BY: The name of the user who uploaded the document.
- VERSION: The name of the document version.
- UPLOAD DATE: The date and time the document was uploaded.
- STATUS: The status of the document.
- All Status
- Published
- Unpublished
- ACTIONS: Actions that can be performed on the document.
- If required, perform any of the following ACTIONS:
- Show notified users: Displays the list of users who have been notified of a modification or publication of the document through the Review your drawing sheets window.
- Delete upload: Deletes the document.
- Edit upload: Brings you to the Review your drawing sheets window.
- You can also click on a document to Review your drawing sheets. In this window, apply any required changes, perform More Options ACTIONSthrough the three dots menu:
- Use PDF Name: Will enter the name of the PDF that was uploaded in the NAME field.
- Trim suffix: Trims the name of the revision to remove what comes after the period so that hyperlinks work correctly (e.g.: A101.01 will be trimmed to A101)
- Add Description: Will add a DESCRIPTION field where you enter a complete description of the document.
- Delete: Will delete the document.
Or Click NEXT to Notify your colleagues and PUBLISH the document.
Manage Version Sets
Allows editing and deleting the version sets that were created or used when documents were uploaded in STACK | Build & Operate.

Click the Manage Version Set icon.
Click the version set you want to edit to modify the name or delete the ones you don't want. You can also check the box to not have it appear when applying a filter.
Click SAVE.
Click the X to close the window.
To remove a filter, click the X in the filter pill.
Publish a Document
You can publish a document when uploading it through the Upload button. See Upload a Document for more details.
If a document has already been upload but not published yet, you can go into your Upload History to publish it.

Click the History icon.
Find the document you want to publish.
Click on the plan or click the three dots and select Edit upload.
Fill in the CREATE NEW VERSION SET and ISSUE DATE AND TIME info or click SKIP AND PUBLISH.
NOTE
If you use SKIP AND PUBLISH, the PDF name of the document will be used as the sheet title and the version will be called Uploaded On by default with today’s date and time.
Filter or Search for Documents
.gif)
Use the Tags and/or Versions filters to filter the documents, or use the search bar to find a document in particular.
The most relevant results will be displayed in the Documents list.
Download the PDF of a Document

From the left side navigation menu, select Documents.
Navigate to the document you need.
Click the the three dots in the ACTIONS column.
Select Download PDF.
The file will be downloaded into your internet browser's downloads.
Click to open and save it to your computer.
Rename a Document

From the left side navigation menu, select Documents.
Navigate to the document you want rename.
Click the the three dots in the ACTIONS column.
Select Rename.
Edit the Document name.
Click SAVE.
Delete a Document

From the left side navigation menu, select Documents.
Navigate to the document you want delete.
Click the the three dots in the ACTIONS column.
Select Delete.
You will be asked to confirm that you want to permanently delete the document. Check the check box and click YES.
The document will be removed from STACK.
Next Steps
Now that you are familiar with the functions in the Documents tab, you are ready to explore Revisions:
Related Articles
If you need additional assistance, please Contact Us.
Was this article helpful?